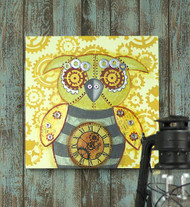
Mixed Media Gear Owl
Posted by DecoArt on Apr 29th 2015
Mix steampunk with mixed media to create a unique owl canvas with DecoArt Media®.
SUPPLIES
- water container
- palette or plastic plate
- paper towels
- tracing paper
- transfer paper
- scissors
- 3/4" flat brush
- #8 flat brush
- craft glue
- #1 round brush
- assorted scrapbook paper
- picture of a clock face
- cosmetic sponges
- 12" x 12" basswood canvas
- pen or pencil
- bolts and washers
INSTRUCTIONS
NOTES:
Let dry completely between painting steps.
- Make sure the basswood surface is clean and dust free.
- Use a 3/4" flat brush to mix (1) part Green Gold with (1) part Titan Buff. Use mix to paint the entire wooden canvas, sides included. Rinse brush. Let dry completely.
- Use the Americana Gears and Cogs Stencil over the entire front of the canvas. Load a cosmetic sponge with Transparent Yellow Iron Oxide and pounce over the canvas front. Wash the stencil. Let the canvas dry completely.
- Use pen or pencil and the tracing and transfer papers to trace and transfer the body and head outline of the owl onto scrapbook papers of choice.
- Use scissors to cut out the body parts.
- Working quickly, use a 3/4" flat brush to apply a coat of Matte Medium over the area where the owl will be.
- Place the body down and the head overlapping it, then smooth out with the 3/4" flat brush and add more Matte Medium on top to seal. Rinse brush.
- Print off a clock face of choice and cut out with scissors.
- Trace and transfer the owl wings onto another scrapbook paper of choice. Use scissors to cut out the wings.
- Use a 3/4" flat brush and Matte Medium to adhere the wings and the clock in the belly of the owl. Brush more Matte Medium on top to seal. Rinse brush.
- Trace and transfer stripes on the belly or freehand. With a #8 flat brush, make a wash of Dark Grey Value 3 and water to create stripes. Let dry. Use the same brush and load with just Dark Grey Value 3 to make bold horizontal strokes. Rinse brush.
- Use a #8 flat brush to mix (1) part Transparent Yellow Iron Oxide with (1) part water to make a wash. Use the wash to paint over the tops of the ears and the outer perimeter of head and wings and to make a faded haze around the entire owl. Rinse brush.
- Use a #8 flat brush and Transparent Red Iron Oxide to paint over the center of the clock and outline the border. Rinse brush.
- Use a found object and pen or pencil to trace circles for the owl's eyes. (I used a wide paint bottle.)
- Use a #8 flat brush and Gold Metallic to fill in the eyes. Rinse brush.
- Use a pen or pencil and the tracing and transfer papers to trace and transfer the beak to the canvas.
- Use a #8 flat brush and Medium Grey Value 6 to paint the right side of the beak. Rinse brush. Use the same brush and Dark Grey Value 3 to paint the left side. Rinse brush. Use the #1 round brush and Dark Grey Value 3 to outline the whole beak. Add a small amount of Medium Grey Value 6 to the same brush to shade the right side of the beak. Rinse brush.
- Use pen or pencil and the tracing and transfer paper to trace and transfer the gear lower eyelids.
- Use a #1 round brush and Dark Grey Value 3 to outline the lower eyelids. Rinse brush. Use the same brush and Silver Metallic to fill in the eyelids. Rinse brush. Let dry completely.
- Reapply the Americana Gears and Cogs Stencil over the eyes. Load a new cosmetic sponge with Transparent Red Iron Oxide to pounce on both eyes. Wash stencil.
- Use a #1 round brush and Transparent Red Iron Oxide to outline the owl and add the robot lines and gear patterns on wings. Rinse brush.
- Once dry, use craft glue to adhere washers and bolts to the eyebrows, nose holes, and wings.

