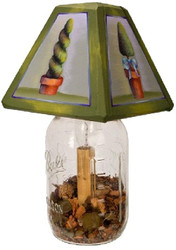
Garden Lights Lamp
Posted by DecoArt on Jan 30th 2015
Light up a living space with a classical garden image on a glass jar upcycled into a lamp.
SUPPLIES
- water container
- palette or plastic plate
- paper towels
- 1" flat brush
- #2 round brush
- fine-grit sandpaper
- #8 flat brush
- clean cloth
- 1/2" masking tape
- #14 flat brush
- #0 mop brush
- #0 script liner brush
- #16 flat brush
- Ball jar lamp with wooden shade
INSTRUCTIONS
NOTES:
Adjust the size of the pattern to the lamp surface.
- Sand the surface with fine-grit sandpaper and then remove dirt with clean cloth.
- Use 1” flat brush and Americana Primer & Sealer to coat. Let dry. Sand again if necessary.
- Use a 1” flat brush to paint the edges of shade, in about 3/4" or so, with Light Avocado.
- Tape off each edge with 1/2" masking tape, pressing sides of the tape down well. Basecoat over the edge Light Avocado to seal. Basecoat inside the tape Slate Grey.
- With a dry #14 flat brush, pick up Light Avocado, taking out excess on the palette. Load in Yellow Green, take out the excess on the palette, and dry-brush the center areas of Light Avocado band.
- Remove the tape and sand edges.
- Using a #16 flat brush, side-load in Light Avocado, blend, and apply grass at the bottom of each section.
- With a script liner brush, add a line of Deep Periwinkle between the Light Avocado and Slate Grey areas.
- Side-load Wisteria onto a #16 flat brush, blend, and add back-to-back floats in the center of the line for highlight. Clean brush, pick up Dioxazine Purple, blend, and add back-to-back floats at the corners for shading.
- Basecoat the flower pots Burnt Sienna. Allow to dry. When dry, apply a fairly thin coat of Weathered Wood and allow to dry.
- Basecoat the pots Shading Flesh.
- Using a dry #14 flat brush, pick up Medium Flesh, take out excess on palette, and dry-brush horizontally, a little to right of center, for highlight. Repeat, picking up Butterscotch on a dirty brush and adding a highlight in the center of the previous highlight, leaving “halo” of original color on each side.
- Shade both sides of the pot, under the lip, and inside the pot with Burnt Sienna; reinforce inside the pot, on the left side of the pot, and under the rim on the left with Antique Maroon.
- Add a bit more shading inside the pot and under the rim at left with Dioxazine Purple.
- Load a #2 round brush in Traditional Burnt Umber, pressing to flatten; load one corner into Butterscotch; blend; and add trunks for the topiaries, keeping Butterscotch on the right.
- Add foliage using a dry #14 flat brush on larger areas and a dry #8 flat brush on smaller areas: load into Evergreen, take out excess, and begin filling in area. Wipe the brush on a dry paper towel, pick up Light Avocado mostly on the “toe” of the brush, smash to blend, and begin tapping color on the right side, moving toward left and filling about 2/3 to 3/4 of the area.
- Wipe the brush on a dry paper towel, pick up Wasabi Green on the “toe”, and add more highlight to right side, moving about halfway across area. Repeat, picking up Yellow Green, moving about 1/4 across area; repeat picking up Cadmium Yellow and highlighting mainly the top right of each foliage area.
- Using either a clean, dry brush or flat brush, side-load into Dioxazine Purple and add more shading to the lower left of the foliage area. (On the spiral tree, I did back-to-back floats inside the shadow area.)
- Using a #2 round brush, basecoat one ribbon Raspberry. Highlight with back-to-back floats in center areas, at top of knot, on tips of streamer ends, and side of one streamer with Pink Chiffon. Shade with Antique Mauve, then add Vivid Violet over that shading.
- Basecoat the other ribbon Salem Blue. Highlight with Spa Blue as above. Shade with Williamsburg Blue. Add very light shading in the darkest areas of both ribbons with Dioxazine Purple.
- Using a flat brush side-loaded in Vivid Violet and using lots of water in brush, add touches of color to the foliage, pots, and a little on the Salem Blue ribbon. Using the same technique and Salem Blue and/or Spa Blue, add more color to the foliage, pots, and a little on the Raspberry ribbon.
- Dampen the area to the right of the topiary and pot and add float of Wisteria, using the largest brush (mop brush, if necessary). Using the same technique, add a float of Wasabi Green to the left side.
- Seal with DuraClear Satin Varnish, allowing to dry between coats.

