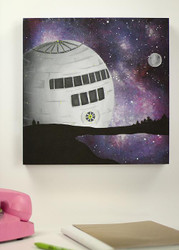
Space Ship with Galaxy Background
Posted by DecoArt on Oct 29th 2015
"To infinity and beyond!" on an out-of-this-world canvas using Americana® Acrylics and Dazzling Metallics.
SUPPLIES
- palette or plastic plate
- paper towels
- transfer paper
- sandpaper
- pencil
- #3 round brush
- 1" flat brush
- 1/4" flat brush
- #0 liner brush
- sea sponge
- wooden panel
INSTRUCTIONS
NOTES:
Let dry completely between painting steps.
- Sand the panel surface to remove any rough edges. Wipe away sanding dust with a paper towel.
- With a 1" flat brush, paint the panel Lamp Black.
- Wet a sea sponge and squeeze to remove the excess water. (The sponge should be damp but not dripping.) Load two different areas of sponge with small amounts of Winter Blue and Soft Heather. Use a pouncing motion to apply paint to the panel, rotating between colors. Concentrate in the upper right and a small area in the lower left. Clean sponge.
- With a dampened sponge, begin carving out the dark areas. Load the sponge with Red Violet and Ultramarine Blue in two different areas. Pounce between the two colors on the outside of the light areas, blending in toward them to create a gradation of color. In another area on the sponge, load Dioxazine Purple. In the dark areas, pounce a small amount of paint for added depth. Clean sponge.
- With a dampened sponge, load Wisteria. Pounce in areas you would like to be lighter. For added highlight, apply a little bit of Soft Heather as well. On a different spot of the sponge, load Lamp Black. Lightly pounce over the outskirts of the light areas in some areas. Do not clean sponge.
- Load Fiery Red (Neon) and Electric Blue (Neon) onto the sponge. Pounce both colors randomly on the areas where the light and dark colors meet. Load a very small amount of Shimmering Silver onto the sponge. Be careful to add just a small amount to the upper right and lower left corners of the panel. (These will be the brightest areas). Lightly pounce in some areas around the panel.
- Water down some Snow White. With a fan brush, flick the bristles that are loaded with paint onto the panel to create stars.
- Transfer the pattern onto the panel with white transfer paper.
- Paint the ship and moon in Grey Sky. Paint the windows of the ship and the landscape in Lamp Black. (Use a 1" flat brush for the large areas and a #3 round brush for the smaller areas.)
- Mix Grey Sky with a small amount of Lamp Black. Begin shading by applying Lamp Black to the left side of the ship with a 1" flat brush. Place the Grey Sky/Lamp Black mix next to the Lamp Black and begin blending together. Slowly blend the Grey Sky/Lamp Black mix into the Grey Sky. (If needed, mix Drying Time Extender into paint for longer blending time.)
- Paint windows in a mix of Lamp Black with a small amount of Grey Sky. Using a liner brush, paint the circle shape at the top of the ship. Let dry. Once dry, use Grey Sky and a liner brush to paint in the window grids. Mix Grey Sky with a very small amount of Lamp Black and use for the line-work throughout the ship. Save this mix for next step.
- Water down the mix from the last step. Use to add shading to the line-work. (Refer to photo.) Add darker Grey Sly dots with the handle end of the brush randomly by the line-work.
- Using the handle end of the brush, add Margarita around the circles and throughout the ship and shade the moon. Add dots and lines in Lamp Black to create detail. Let dry. Once dry, go back to the landscape and redo the edge.
- Using a 1/4" flat brush and Lamp Black, create the trees to the left and right side of the landscape.


