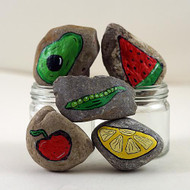
Fruit and Veggie Painted Rocks
Posted by DecoArt on Jun 20th 2018
Remind your little ones to eat their fruits and veggies with rocks painted with Americana® Multi-Surface Acrylics.
SUPPLIES
- pencil
- liner brush
- black fine point marker
- small and medium brushes
- round brush
- rocks
INSTRUCTIONS
NOTES:
Be sure the rocks are smooth, clean, and dry.
- Apple: Sketch the apple design onto the rock. Using Lipstick for the apple and Turf Green for the stem, paint the colors in with a small paintbrush, using the liner brush when necessary.
- Apple: When the desired coverage is reached (it may take more than one coat) and the paint has dried, outline the apple and add shading using the fine point permanent marker. Using Cotton Ball and the liner brush, add highlights. (See photo.)
- Avocado: Sketch the avocado design onto the rock. Using Turf Green, paint the entire avocado shape with the small paintbrush.
- Avocado: Mix a small amount of Turf Green into a larger amount of Canary to make a light yellow green. Paint the avocado, leaving a small outline of the dark green visible using the small paintbrush. (Save any leftover paint to use on the pea pod and watermelon rocks.)
- Avocado: Use Black Tie to paint in the avocado seed with the small paintbrush.
- Avocado: When the desired coverage is reached (it may take more than one coat) and the paint has dried, outline the avocado and add shading using the fine point permanent marker. Using Cotton Ball and the liner brush, add highlights to the avocado seed.
- Lemon: Sketch the lemon design onto the rock. Using Canary, paint the lemon slice with the small paintbrush.
- Lemon: Mix a small amount of Canary into a larger amount of Cotton Ball until you get a pale yellow. Paint in the triangles using the round paintbrush.
- Lemon: When the desired coverage is reached and the paint has dried, outline the lemon slice and add shading as well as texture using the fine point permanent marker.
- Peas: Sketch the pea pod onto the rock. Using Turf Green, paint the entire pea pod with the small paintbrush, using the liner when needed.
- Peas: Mix a small amount of Turf Green into a larger amount of Canary to make a light yellow green (or use the leftover light green) to paint what will be the inside of the pea pod.
- Peas: Add shading and outline with the fine point permanent maker. Lighten the green paint mix used in step 3 with more Cotton Ball. Use the new mix and the round paintbrush to paint in tiny circles (peas).
- Peas: When the desired coverage is reached and the paint has dried, outline the peas and touch up the outline on the pea pod with the permanent marker.
- Watermelon: Sketch the watermelon slice. Using a small paintbrush, paint in the watermelon fruit with Lipstick and the rind with Turf Green.
- Watermelon: To paint in the fruit, use Lipstick and the small paintbrush. When the desired coverage is reached and the paint has dried, outline the watermelon slice, being sure to add shading as well as texture using the fine point permanent marker. Using Cotton Ball and the liner brush, add highlights to the rind. (See photo.)


