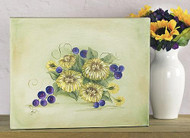
Fruit and Flowers Canvas
Posted by DecoArt on Oct 19th 2016
Easy, breezy grapes and flowers make this project a fun and simple one for you to try.
SUPPLIES
- palette or plastic plate
- paper towels
- tracing paper
- 1" flat brush
- 1/2" flat brush
- #8 flat brush
- 1" pouncer
- canvas
- 5/0 liner brush
- dark graphite paper
- eraser
INSTRUCTIONS
- Base the surface with Bleached Sand with a large flat brush. Let dry.
- Dampen the surface with Drying Time Extender with a clean, large flat brush.
- Wipe off any excess Drying Time Extender with a soft paper towel.
- Using the large flat brush, slip-slap Plantation Pine onto the center and corners of the canvas. While still damp, soften these Plantation Pine areas with a soft paper towel. Let dry. Slip-slap more Plantation Pine on the rest of the canvas, keeping the color lighter than the center and corners of the canvas. Soften with a soft paper towel.
- Transfer the pattern with dark graphite paper.
- Refer to the step-by-step worksheet below for additional help and placement of color.
- Leaves: Edge the small flat brush into Plantation Pine on one corner. Blend slightly on the palette. Keeping the green side of the brush against the stem end of the leaf, pull across the stem end of the leaf and then slide down on the vein area of the leaf.
- The lighter areas of the leaves are pulled in with Celery Green using the #8 flat brush. (Keep the Celery Green to the outside edge of the leaves.)
- Outline the leaves and their veins with a 1:2 mix of Raw Sienna and Plantation Pine, using the liner brush dampened with water.
- Aster flowers: Using the small, flat edge of the 1/2" flat brush, dip one edge of the brush into Raw Sienna. Pull lines for the petals where they connect to the flower center, using the chisel edge of the brush.
- Leave the brush dirty and add Antique Gold Deep on the same dirty corner and pull from the outside end of the petals toward the center. After one layer of petals, add Golden Straw on the same dirty corner of the brush and apply the next layer of petals. (The petals are pulled from the outside edge toward the center.)
- Add Sunny Day to the dirty brush corner and apply the last full row of petals. The last layer of petals is Snow White added to the dirty brush and applied to the right half of the flower only.
- Clean the brush and edge it into a little Raw Sienna on one corner. Dip the same corner of the brush into Plantation Pine. Apply these colors in a hit-or-miss fashion with the darkest color being in the center of the flower. Soften the outer edges of the center color with a soft paper towel.
- The center of the flower is dabbed with Raw Sienna and strokes in the center are the same colors as used in the outer petals, using the liner brush. Pull stems from the smaller flowers toward the center of the canvas, using the 1/2" flat brush filled with Plantation Pine. (Refer to larger finished picture.)
- The grapes are dabbed on with the pouncer with Red Violet and a small amount of Ultramarine Blue on one side of the pouncer. Dab onto the palette first to see the grape and add more color, if necessary. Set the pouncer on the canvas and gently twist the handle a 1/4 turn.
- Repeat if you want a more blended grape. Let dry, then highlight the grape with a stroke of Snow White using the liner brush. Let dry.
- The vines for the grapes are a 1:1 mix of Raw Sienna and Plantation Pine, using the liner brush plus a little water. Save mix for next step. Let dry.
- Shade underneath the grapes with the same Raw Sienna/Plantation Pine mix using the #8 flat brush well-dampened with water. (Refer to photo.) Let dry.
- When everything is dry, use the eraser to remove any remaining pattern lines. Apply a coat of DuraClear Satin Varnish and let dry.
- Frame the canvas or leave as is.


