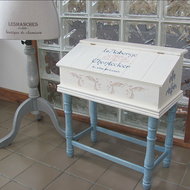
Stenciled French-Themed Chalky Finish Chest
Posted by DecoArt on Oct 27th 2015
Add French elegance to a plain wooden chest with stenciling, texture, and muted color.
SUPPLIES
- palette or plastic plate
- paper towels
- sandpaper
- ruler
- painter's tape
- 2" chip brush
- screwdriver
- 2" foam brush
- 1" foam brush
- brayer
- 3" flat brush
- stencil of your choice
- palette knife
- 1/2" stencil brush
- 1" pouncer
- scrapbook paper
- chest
INSTRUCTIONS
NOTES:
Let dry completely between painting steps.
- Thoroughly clean the chest surface. If needed, lightly sand and wipe away any sanding dust.
- Mix together equal parts of Primitive and Escape. Apply two coats of the mix to the legs of the chest, allowing paint to dry completely between coats.
- Remove the lid from the chest with a screwdriver. Paint the outside and upper portion of the chest in Lace, including the lid. Apply coats until the desired opacity is achieved, allowing paint to dry between coats.
- Paint the inside of the chest in Timeless.
- Using a fine-grit sandpaper, lightly distress the entire piece. Focus on the edges, allowing the color underneath to show through. Wipe away any sanding dust with a paper towel.
- Apply a very small amount of Lace onto a dry 2" chip brush. Wipe off the excess on a paper towel. Using a light and quick motion, brush randomly over the legs. Allow to dry. Repeat with Timeless.
- Measure the center point of the lid. Position the Americana Decor French Inn Stencil in the center. If needed, cover any areas of the stencil that won't be painted on. Using a stencil brush, apply Night Sky to only the center lettering of the stencil.
- Measure the center point of each side of the chest. Adhere the Americana Decor Fleur de Lis Tile Stencil and tape down. Using a palette knife, apply Dimensional Effects over the stencil in a smooth, even coat. Carefully remove the stencil while the Dimensional Effects is still wet. Repeat on the other side of the chest, then go over the swirl motif on the lid. Let dry.
- Once dry, tape the Fleur de Lis stencil back over the flourish. On the sides of the chest, use a pouncer to apply Night Sky. Let dry. Once dry, apply White Pearl with a pouncer. Repeat for the other side of the chest.
- Lightly distress the lettering on the lid using a fine grit sandpaper. Wipe away dust with a paper towel.
- Mix (2) parts Pink Cadillac with (1) part Shrimp. Place The French Inn stencil back over the lid. With a pouncer, apply the mix to the swirled motif area. Let dry. Once dry, lightly dab Mushroom over the same area, allowing the Pink Cadillac/Shrimp color to show through.
- Lightly apply White Pearl over the swirl design. Carefully remove the stencil.
- Measure the center point of the lower portion of the chest. Attach the stencil of your choice with tape to the left side of the center. Mix equal parts of Mushroom and Shrimp. Apply to the stencil with a foam pouncer. Let dry. Once dry, apply White Pearl onto the stencil. Let dry. Once dry, flip the stencil to reverse the design and repeat the steps on the right side of the chest.
- Using a foam brush, apply a thin even coat of Americana Matte Decou-Page to the inside of the chest. Place down the scrapbook paper of your choice onto the chest.
- Use a brayer to remove any wrinkles or bubbles. Apply a topcoat of Decou-Page.
- Coat the entire chest with a thin coat of Light Satin Varnish. Let dry. Once dry, reattach the lid.


