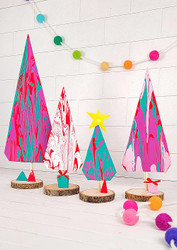
Fluid Art l Paint Pour Tree Decor
Posted by DecoArt on Dec 17th 2020
Add bright colors of DecoArt® Fluid Art Ready-to-Pour™ to some simple shapes for a fun holiday display.
SUPPLIES
- scissors
- ruler
- X-Acto® knife
- multi-purpose liquid glue
- foam core board
- wooden skewer
- medium round brush
- cardstock paper
- wooden rounds
- pencil
- grate
INSTRUCTIONS
NOTES:
Before you pour: plan ahead on how you will stand the trees up while drying.
There are so many ways to add the DecoArt Fluid Art Ready to Pour paint colors onto the tree shapes. I will show you several ways and the colors I used for each application.
- Gather the materials.
- Using a ruler, draw different-sized triangles onto the foam core board. Cut out the triangles with an X-Acto knife. Trim off the bottom corners of the triangles. (Put the tiny trimmed off triangle aside for later.) Stick the pointed side of the wooden skewer about 1" into the the middle of the bottom edge of the tree shapes.
- Using the skewer as a handle, pour a swirl of True Red onto both sides of the foam core tree. Pour a swirl of White on top of the True Red. Move the shape around to let the paint swirl together on the surface, creating a nice pattern. Stick the tree by the skewer into a grate to drip dry. (You can use a grate, cardboard, or something else to keep the tree shape from touching anything while it dries.)
- With the next tree shape, pour lines of Bright Violet and Dark Aquamarine onto the surface of both sides. Add a swirl of True Red and move the paint around to get a nice pattern. Let dry, by propping the skewer in a grate to drip dry.
- Another way to add paint onto the tree surface is to basecoat the shape first. For example, pour True Red onto the shape and spread it out with a finger. Pour lines of Pink and Bright Violet onto the True Red. Add drops of Dark Aquamarine. Swirl the paints by moving the shape around and then prop it up to drip dry.
- While the trees are drying, paint out some Bright Yellow onto a sheet of white cardstock using a medium round brush. Let dry completely. Cut two squares for each star. Face the painted sides together and draw or trace a star shape. Holding the pieces together, cut out the star. Turn the star shapes (painted surface facing out) and glue together. (Leave a spot at the bottom unglued to stick onto the tree later.)
- To make the tree bases, break or cut off the pointed tip of a skewer, approximately 3". Break off two other pieces (same size as each other) that are 1" less than the first piece. Group them together to fit into the pre-cut wooden round hole. (If it is loose, add a touch of glue to secure.) Remove the trees from their drying skewers and place onto the base skewer. Add a drop of glue to the tip to secure and push the tree down until the base is on top of the two side sticks.
- Optional: Stick the tiny triangle trimmings onto a skewer and paint solid with True Red or Dark Aquamarine. Allow to dry and glue to the bottom of base as baby trees.
- Add the stars to the tops of trees with a drop of glue. Include any other embellishments that you would like (glitter, beads, small presents, trimmings, figurines, etc.)
- Place with DIY gingerbread houses to make an colorful village.


