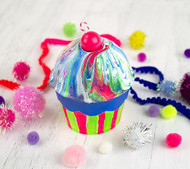
Fluid Art l Paint Pour Gift Box
Posted by DecoArt on Jan 22nd 2021
Make this drab-to-fab box for a desk or a gift with DecoArt Pouring Medium™.
SUPPLIES
- paper towels
- X-Acto® knife
- craft sticks
- wooden skewer
- string
- small flat brush
- disposable cups
- hot glue gun with clear glue sticks
- grate
- wooden bead
- medium oval brush
- paper mache cupcake box
INSTRUCTIONS
- For the papier mâché cupcake shape, pick a wooden bead that would be the right size for the "cherry on top".
- Using an X-Acto knife, cut out a circle-shaped hole in the lid of the cupcake box lid that will fit the wooden bead later. (See photo.)
- Stuff some paper towels in the cut opening to prevent paint from filling the inside. (See photo.) If the bead has a hole, place it on a wooden skewer or on the handle end of a paintbrush for painting.
- Gather the materials. Using four cups, mix Pouring Medium with Multi-Surface Acrylic color: Pink (Neon), Blue (Neon), Green (Neon), and White Birch. (Follow the instructions on the Pouring Medium Bottle for paint mix ratios.) Use a craft stick to mix each paint/medium mix thoroughly.
- For a dirty pour, pour the previously-mixed colors into a clean cup, layering each on top of each other. (Do not mix.)
- Set the top of the cupcake box onto a protected surface. (I like to use a reusable grate so excess paint can drip down; you can also use an aluminum foil pan.) Pour the cup of layered paint onto the cupcake box lid in a circular motion. (TIP: Add more colors and pour again until you get your desired look.) Leave to dry completely.
- For the wooden "cherry", pour the Pink (Neon)/Pouring Medium mix onto the bead and allow to dry.
- For the bottom of the cupcake, paint with White Birch, using a medium oval brush.
- Paint a design over the White Birch with Pink (Neon), Green (Neon) and Blue (Neon), using a small flat brush. Let dry completely. Add another coat of each color. Allow to dry.
- Using hot glue, attach the "cherry" on top of the cupcake". For an added touch, loop a piece of string for the "stem" and glue in place. (See photo.)
- The possibilities are endless using the Pouring Medium and different paint pouring methods.
- Use this fun container to hold a gift or an everyday item.


