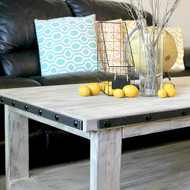
Chalky Finish Faux Metal Rustic Coffee Table
Posted by DecoArt on Jul 25th 2016
Create a weathered, designer look to a DIY coffee table with Americana Decor® Chalky Finish™.
SUPPLIES
- water container
- paper towels
- sandpaper
- 3" chip brush
- rubber gloves
- small container
- steel wool
- old rag
- tacks
- hammer
- 1" foam brush
- small hand drill
- wood stain
- MDF
- glaze
INSTRUCTIONS
NOTES:
Let dry completely between painting steps.
- Build the table. For table-building instructions, visit [[Ana White|http://www.ana-white.com/2012/07/plans/rustic-x-coffee-table]]
- Stain all visible surfaces using a dark stain according to label instructions. Allow the stain to dry completely.
- Using a 3" chip brush, dry-brush on Lace on all stained areas. (Dip the brush in paint and dab off excess paint on a paper towel before applying on the surface.)
- Put on gloves. Using steel wool, sand off some of the paint, moving in a circular motion. Wipe away any dust with a paper towel.
- Using an old rag, use a glaze of choice on all visible surfaces.
- Make a white wash by adding water to Lace in a small container. Paint the visible surfaces with the white wash. (The longer the wash is left on the table, the more white it will turn.) Wipe off excess water once you achieve desired look.
- Cut (4) 1" strips out of a 1/4" sheet of MDF. Cut (2) strips to 49" and the other (2) strips to 26". Sand the rough edges.
- Using Burnt Sienna, dry-brush around the edges of the strips to get a rust look.
- Paint the strips using a 1" foam brush in Carbon.
- Lightly sand the edges to let a bit of the Burnt Sienna show through.
- Apply a small amount of Shimmering Silver onto a foam brush. Dry-brush on parts of the edges to add a metallic look. Let dry.
- Once dry, mark where the tacks will go. (Mark 1" from the ends of the strips. Mark every 4" on the short sides and every 6-1/4" on the long sides.)
- Pre-drill small holes where the tacks will be placed: Use a 1/16" bit; only mark and do NOT drill all the way through the strips.
- Position the strips on the sides of the coffee table and tack them on using decorative black tacks through each of the previously marked holes. (Be careful not to bend the tacks as they are tacked in with a hammer.)

