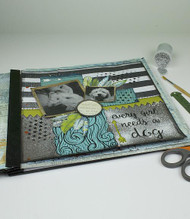
Mixed Media Family Pet Scrapbook Page
Posted by DecoArt on Jan 29th 2016
Pay tribute to man's (and woman's) best friend with DecoArt Media® Fluid Acrylics.
SUPPLIES
- water container
- palette or plastic plate
- paper towels
- stylus or pencil
- transfer paper
- 3/4" flat brush
- #5 round brush
- baby wipes
- #0 liner brush
- adhesive-backed rhinestone gems
- cosmetic sponge
- ultra-fine point black marker
- craft knife
- photo of your choice
- cardstock
- pen
- watercolor paper
- Silhouette electronic cutting machine
- embellishments of choice
- E6000 Glue
- stamp of choice
- scrapbook paper
- triangle paper punch
- Glue Dots
- paper crimper
INSTRUCTIONS
NOTES:
Let dry completely between painting steps.
- Load a texture stamp with Silver (Metallic) by brushing on quickly with a 3/4" flat brush. Randomly stamp texture onto the bottom portion of a dark grey piece of scrapbook paper. Keep stamping until the paint is gone and reload the stamp.
- Cut a piece of black and white striped scrapbook paper 6" wide by 12" long with the stripes going horizontally. Adhere down to the dark grey scrapbook paper using Americana Matte Decou-Page and a 3/4" flat brush. (The picture shown is two pieces of scrap striped paper spliced together.)
- With a White (Shimmer) Spray Mister, spray the front of the combined scrapbook papers. Let dry.
- Mix together Pyrrole Orange and Raw Umber to form a rust color. Water down. With a #5 round brush, flick the paint onto the paper.
- Cut out a piece of watercolor paper 4-1/2" x 5". Mix together Cobalt Teal Hue, Titanium White, and a touch of Hansa Yellow Light. Paint the watercolor paper in the mix. Save mix for later step. Let dry. Once dry, use the transfer paper to transfer the provided waves pattern onto the painted watercolor paper.
- Using an ultra-fine tip permanent marker, draw over the waves pattern. (Draw some lines thicker and some thinner.) Cut out with scissors or a craft knife.
- Transfer the provided feather pattern onto watercolor paper.
- Paint in the feathers as desired. (We used: Green Gold, Prussian Blue Hue, Payne's Grey, and the mix from step 5.) To paint the feathers, wet the area of the feather with clean water. Next, run a brush through the centers or inside the feathers for a blended look. Let dry.
- Once dry, use a liner brush to add detailing. Add lines and dots, as desired, in colors of choice.
- Cut out each feather with scissors. Cut the individual fibers of the feather by making a diagonal cut toward the center of the feather, without cutting all of the way through. Repeat so the entire feather is cut. (Refer to photo.) Rub a baby wipe with a small amount of Prussian Blue Hue on it along the feather edges. (This will accent the individual fibers more.)
- Cut a 1" x 12" strip of green-gold colored scrapbook paper. Mark a line approximately in the center of the strip. Using one corner of a triangle punch, punch triangles out of the strip, aligning the top point with the line and the side of the triangle with the previous triangle.
- Cut desired photos to approximately 4" x 4" and 2" x 2-1/2". Cut two pieces of wood grain scrapbook paper to fit around the photos, with approximately 1/4" gap around them. Using a baby wipe loaded with Raw Umber, rub the outside edge of the wood grain paper. Let dry. Once dry, adhere photo to the wood grain paper using Matte Decou-Page.
- Cut two pieces of blue scrapbook paper approximately 4" x 4-1/2" and 2" x 4-1/2". Tear one edge of the paper. (Refer to photo.) Run the paper through a crimper. Load a baby wipe with Prussian Blue Hue and rub along the sides and lightly over the crimped texture.
- Cut a patterned piece of scrapbook paper to fit into the embellishment piece. Write a sentiment of choice on paper with a pen or black marker. Tack the paper in the embellishment with Decou-Page. If desired, fill the inside of embellishment with Liquid Glass. Let dry until Liquid Glass is clear.
- Using Decou-Page, adhere down the elements. (Refer to photo for placement.)
- Using Glue-Dots Pop-Dots, adhere down the two photos. (Refer to photo for placement.)
- Cover blue and green area surrounding the bottom right corner. Spray the uncovered area lightly with White (Shimmer) Spray Mister.
- Cut a sentiment of choice or the provided Silhouette pattern using a Silhouette Electronic Cutter from black cardstock. Using Glue-Dots Micro-Dots, adhere the sentiment onto the bottom right corner.
- Use Glue-Dots Micro-Dots to adhere feathers behind the photos. With the star stencil from the Personally Yours Between the Lines Solid Stencils, randomly sponge on Carbon Black with a cosmetic sponge. Use Titanium White and Green Gold to stencil on arrows from the Americana Array of Arrows Stencil.
- With the ultra-fine tip permanent marker, add doodles of choice throughout the page. Use adhesive-backed gemstones on each photo.
- Using E6000 Glue, adhere the embellishment with the sentiment into place.


DOWNLOADS
"every Girl Needs..." Cut FileFeathers Pattern
Waves Pattern

