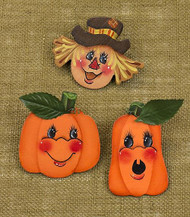
Scarecrow and Pumpkin Fall Pins
Posted by DecoArt on Oct 25th 2014
Add faces, full of expression and color, to wooden shapes to create unique fall fashion accessories.
SUPPLIES
- water container
- palette or plastic plate
- tracing paper
- transfer paper
- #3 round brush
- 1" flat brush
- #10 flat brush
- fine-grit sandpaper
- #1 liner brush
- stylus
- low temp-hot glue gun and glue sticks
- 1/2" angle brush
- #10 blender brush
- pin backs
- fall crafts wooden pumpkins
- fall crafts wooden scarecrows
- small green leaves with stems
INSTRUCTIONS
NOTES:
Let dry completely between painting steps.
The scarecrow's face is like the pumpkin faces; only the colors and the nose change.
- Sand the wooden shapes with fine grit sandpaper; seal with Americana Primer & Sealer. Sand again when dry.
- Basecoat the pumpkin with Pumpkin and the stem with Evergreen.
- When dry, transfer the facial features, tracing the pattern onto tracing paper and transferring it to the wooden pumpkin using transfer paper and a stylus.
- Shade by floating around the outer edges and the ridge lines with Burnt Orange.
- Shade behind the eyes and under the smile line with Burnt Sienna.
- Dry-brush the cheeks with Country Red. The lip is floated with Country Red.
- Base the eyes with Lamp Black and, using a liner brush, pull out lashes from the center of the eye out. (The middle lashes are longer, and they get smaller as they fan out on the sides.)
- Allow the eyes to dry before floating Blue Mist on the left side of the eyes.
- Two highlight dots of Buttermilk are placed at the 12 and 2 o’clock positions. A small slash is placed around the 7 o’clock position. Place highlights on the cheeks and lip.
- Outline the cheeks, nose, and lips with Lamp Black. The open mouth is painted Lamp Black.
- The stem is shaded with Burnt Umber and highlighted with Olive Green.
- Allow to dry before varnishing with DuraClear Gloss Varnish and gluing on the pin back and leaf onto the pumpkin.
- Basecoat the scarecrow face with Flesh Tone and shade with Burnt Sienna around the face, behind the eyes, and inside the mouth.
- Follow the directions for the pumpkin's eyes (steps 7-9 ) to paint the scarecrow’s eyes.
- Float the lip and dry-brush the cheeks with Country Red.
- The nose patch is also painted with Country Red. Add Buttermilk highlights to the cheeks and lip. The liner work is Lamp Black.
- Inside the mouth is painted with a wash of Burnt Sienna.
- Basecoat the hair with Honey Brown. Use Burnt Sienna and a liner brush to make a few small comma stroke hairs/straw.
- The next layer of strokes is Spicy Mustard. (Be sure to put a few stray hairs in his face.) Shade under the hat with Burnt Sienna.
- Basecoat the hat with Dark Chocolate and shade with Burnt Umber.
- The hat band is based with Spicy Mustard and has Pumpkin stripes.
- The patch is Pumpkin with Spicy Mustard stripes.
- Allow to dry before varnishing with DuraClear Gloss Varnish and gluing the pin to the back.

