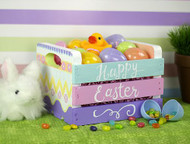
Egg Painted Easter Crate Basket
Posted by DecoArt on Dec 3rd 2015
Crate up those Easter goodies easily in a wooden box colorfully decked out in Americana® Multi-Surface Acrylics.
SUPPLIES
- water container
- palette or plastic plate
- paper towels
- tracing paper
- transfer paper
- painter's tape
- #6 flat brush
- #12 flat brush
- small wooden crate
- #1 round brush
- 3/4" pouncer
- pen or pencil
INSTRUCTIONS
NOTES:
Let dry completely between painting steps.
- Use a #12 flat brush to make all the mixes ahead of time. Mix each color listed above, except Shrimp, with about (4) parts Cotton Ball to turn them pastel.
- Use a #12 flat brush and the Peach Silk mix to paint the inside of the crate. Rinse brush. Use the same brush with Cotton Ball on the sides. Rinse brush. Use the same brush with the Coastal Waters mix to paint the first section. Rinse brush. Use the same brush with the Pink Cadillac mix for the second section. Rinse brush. Use the same brush with the Lavender Fields mix to paint the bottom section. Rinse brush. Use the same brush with the Chartreuse mix to paint inside the handles. Rinse brush.
- Use a pen or pencil and the tracing and transfer papers to trace and transfer the side patterns onto the crate.
- Use the #6 flat brush and the Chick mix to paint on the chevron stripe on the side of the crate. Rinse brush.
- Use the #12 flat brush and the Lavender Fields mix to paint a wavy section on the bottom of the crate. Rinse brush.
- Use the #1 round brush and the Pink Cadillac mix to paint on the swirls. Rinse brush.
- Use the #1 round brush and the Chartreuse mix to paint a wavy stripe on top of the wavy Lavender Fields mix section. Rinse brush.
- Use the #1 round brush and Shrimp to paint small lines in the Chartreuse stripe painted in the previous step. Rinse brush.
- To make sure the stripes are lined up evenly, use painter's tape as a guide line. (Refer to photo.) Use the #1 round brush and the Coastal Waters mix to paint vertical stripes above the Chick mix chevron. Rinse brush.
- Use painter's tape to make a thick stripe. (Refer to photo.) Use the #6 flat brush and the Orange Sherbet mix to fill in the stripe. Immediately remove the tape. Rinse brush.
- Use the 3/4" sponge pouncer with the Pink Cadillac mix to pounce dots on the Orange Sherbet mix stripe. Rinse pouncer.
- Use the handle end of the #1 round brush dipped into the Chartreuse mix to add tiny dots around the stripes and in each Pink Cadillac mix dot. Wipe off the handle end.
- Use the #1 round brush and the Lavender Fields mix to paint the top scalloped section on the crate. Rinse brush.
- Use the same brush and the Coastal Waters mix to outline the scalloped top. Rinse brush.
- Use painter's tape as a guide line to line up the word pattern on the crate front. (Refer to photo.) Use a pencil or pen and the tracing and transfer papers to trace and transfer the pattern for the "Happy Easter" lettering on the crate front.
- Use the #1 round brush and Cotton Ball to paint on the lettering and the squiggle. Rinse brush.


DOWNLOADS
"happy Easter" PatternSide Of Crate Pattern

