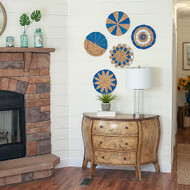
DIY Wall Art
Posted by DecoArt on May 4th 2021
Decorative woven wall baskets are a luxury look in home decor you can make for pennies on the dollar using Americana® Acrylics
SUPPLIES
- #8 flat brush
- #6 round brush
- Woven Charger
- Command Strips
INSTRUCTIONS
NOTES:
Allow each section of paint to dry fully before adding another color, this will prevent paint colors from bleeding into each other.
- I found these amazing woven chargers at a discount store. They were perfect to create the Scandinavian-inspired wall art look I was going for. These wall hangings can get pretty pricey so I thought a DIY version was a great option.
- TIP: These chargers already had lines that I used as a guide to create patterns which I painted free handed. If the chargers you find don't have lines, then painters tape is a great option to help create any lines or patterns you're making.
- I chose to paint with blues and white in Metallic Ice Blue, True Blue and Snow because they work so well together.
- For design inspiration I gathered several images of woven wall baskets with patterns I liked. I used the flat paint brush and started my first pattern at the bottom and worked my way around the charger. See finished photo for reference.
- Paint each section of the charger with 1 coat of paint. Let it dry completely before adding a second coat.
- Continue painting each charger in various patterns that complement one another. Once the paint has fully dried you can add a command strip to the back to hang on the wall.
- Charger #1.
- Charger #2.
- Charger #3.
- Charger #4.
- Charger #5.


