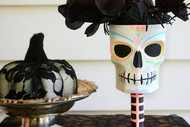
DIY Sugar Skull Decor
Posted by DecoArt on Sep 6th 2018
Items Needed:
- Skull Embossed Plastic Goblet
- Variety Of Brushes
- Paint Pallet
- Faux Flowers Of Your Choice
Instructions:
The first thing I did was to mix my Paint Adhesion Medium in with my paint colors. This really helps the paint to adhere to plastic surfaces.
Then I painted the entire skull white. I wanted to completely cover the orange so I applied 3 coats of the Americana white paint with a large paint brush. Applying the coats thinly allowed for me to get in all the crevices of the skull and helped the paint to dry quickly.
Using a smaller paint brush I added the black accents to the eyes, mouth, and neck.
A fun way to switch it up would be to paint your skull all black! The colors would really pop!
Now comes the fun part! Get out your Americana Neon Lights paints and start creating your Sugar Skull! There is no right or wrong way to paint it. It might help to sketch out an idea on some paper first if you are unsure how you want your sugar skull to look. Sugar skulls typically have accents around the eyes, mouth, forehead, cheekbones, and chin. Pick a spot and start painting!

I started around the eyes of the sugar skull and worked my way out from there, alternating the paint colors as I went. Using a small tip paint brush will help you get the small details painted onto your DIY Sugar Skull.
To top it off I added a black flower crown complete with a black spider to my Sugar Skull. It’s the perfect combination of spooky and glam!

