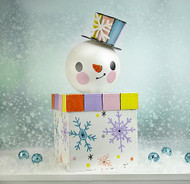
DIY Snowman Box for winter using Pearls
Posted by DecoArt on Jan 14th 2021
Upcycle a brightly colored snowman box to liven up your winter decor!
SUPPLIES
- tracing paper
- scissors
- liner brush
- craft foam
- plastic ornament
- small flat brush
- paper mache box
- -hot glue gun with clear glue gun sticks
- medium paint brush
- exacto knife
- •pencil
INSTRUCTIONS
NOTES:
When choosing (or upcycling) a plastic ornament and a paper mache box, make sure the sizes of both work together to form your snowman!
- Gather substrates to work on. A round ornament, paper mache box and a sheet of white craft foam.
- Paint the ornament and box with a basecoat of White Americana Acrylic using a soft oval brush. Allow to dry.
- Pain the ornament and the box with White Pearl Paint using an oval brush. Allow to dry.
- Print out the provided top hat pattern, cut out the shapes and use them as a template to trace onto the foam sheet. Cut the foam using scissors.
- Begin by hot gluing one end of the body of the hat to one half of the connector. Wrap the body of the hat around so both sides meet and glue to the other half of the connector piece so that the body of the hat is flush together. (The connector piece will be inside the hat and should not be visible on the outside.) Glue the smaller circle to the larger end of the body shape. Apply glue to the smaller end of the top hat and place onto the larger bottom circle. Allow to cool completely.
- Paint top hat with a basecoat of White Americana Acrylic as well. Allow to dry.
- Trace the end of your ornament onto the middle of the box lid. Cut out the circle using an exacto knife. (This will allow for the head of the snowman to sit flush with the lid when glued together later.)
- Using the provided snowflake patterns, draw the snowflakes onto the box sides using a pencil or trace designs on using tracing paper. (You can change up the design by using your favorite snowflake shapes!) Paint a snowflake pattern with Coral Pearl Paint using a soft liner brush.
- Draw the designs of snowflakes, snowman's face and stripes on the top hat and the lid of the box using a pencil (or transfer image using tracing paper). Begin painting on the Americana Pearl Paints using a soft flat brush. I painted on one color at a time onto all of the surfaces. I used Bright Orange Pearl Paint for a hat stripe, stripe on the lid and the snowman's nose.
- Using the provided snowflake pattern, draw the pattern onto the top of the box using or use tracing paper to transfer the design. Paint with Desert Turquoise Pearl Paint using a soft liner brush. Add dots of blue with by dipping the end of the brush into the paint and dabbing on.
- Continue painting a stripe on the lid/hat and a snowflake on the sides of the box using Purple Cow Pearl Paint.
- Draw the snowman's face using the provided pattern as a guide or use tracing paper to transfer the image of the face. Paint Baby Pink Pearl Paint onto the cheeks using a soft flat brush. Paint a strip onto the hat as well.
- Next, paint stripes with Bright Yellow and Coral Pearl Paint. Allow to dry.
- Using a liner brush, paint the details of face and the lines that separate the stripes of colors with Lamp Black Pearl Paint. Also, paint black onto the eyes of snowman, tiny snowflake accents and dots onto the sides of the box for a little more definition of the design.
- For the top of the hat and the brim, paint with Lamp Black Pearl Paint. Allow to dry.
- Draw a small snowflake shape onto a piece of the craft foam. Cut out the snowflake. Flip over and paint with White Pearl Paint. Allow to dry.
- Attach to the top hat using a dot of hot glue.
- Stick the head of the snowman into the hole of the lid. Align the head where you want and place hot glue into the seam. Allow to cool.
- Hot glue the top hat onto the snowman's head. (Add some whimsy by gluing the hat slightly askew.)
- This a great winter project to fill the dreary days with cheer! Wonderful decor piece or use to hold anything you'd like.


DOWNLOADS
Sample Patterns-face/lidSample Pattern-sides Of Box
Top Hat Pattern

