DIY Scalloped Dresser
Posted by DecoArt on Jan 2nd 2017
For the past year and a half, my daughter has had this simple unfinished dresser sitting in her bedroom.
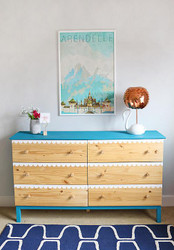
For that entire year and a half, I have been telling myself that I needed to paint it or stain it or do something to cheer it up a bit! Finally, this week I decided to get it done. Americana Décor Satin Enamels made it easy for me to create a cute and whimsical scalloped design in only an afternoon, and now my daughter’s room is feeling much more bright and cheerful.
If you would like to give a sad piece of furniture a little update in your home, I will walk you through all of the steps to create that happy scalloped look.
Items Needed:
- Americana Decor Satin Enamels 8oz - Pure White (ADSA02-36)
- Americana Decor Satin Enamels 8oz - True Teal (ADSA11-36)
- Brushes
- Removable Vinyl
- Electronic Cutting Machine Or Circle Punch
- Unfinished Wood Dresser
Instructions:

I started my dresser makeover by painting the top, sides, and legs of my dresser with DecoArt Americana Décor Satin Enamels in True Teal.

I love that this paint does not require a lot of sanding and prep. Since I was working with bare wood, I just wiped the dresser off with a damp rag, and then I was ready to paint. It took about two coats to get good coverage and I used less than one 8 oz jar.

While that was drying I moved on to creating the scallops on my drawer fronts. The first step in creating the drawers’ scalloped edges is to prepare a vinyl stencil. I used my electronic cutting machine to cut the stencil from removable vinyl, but if you don’t have a machine, you could use a round circle punch to get a similar effect. I cut the stencil to be just a couple of inches longer than the drawer front so it could wrap around the sides.
When my stencil was ready, I positioned it about a half inch below the top of the drawer and smoothed it down with my fingers. Then it was time for the secret to perfect stenciling – decoupage! I used a thin coat of matte decoupage over the edge of my stencil. This keeps the stencil sealed down to your surface and prevents any paint from seeping under the vinyl, giving you a crisp line.

When the decoupage was dry, I painted the scalloped edge with a smaller brush, always pulling the brush away from the stencil (never pushing paint towards the stencil edge). It took two coats to get good coverage.

Finally, I pulled off the stencil to reveal my perfect scalloped edge!

I repeated this process for each drawer front, and my dresser was all done.

I am so happy with the way this dresser turned out! It looks so sweet in my little girl’s room, and I think the contrast of the bare wood with the white scallops makes it really interesting and fun. And Satin Enamels made it such an easy project too!


