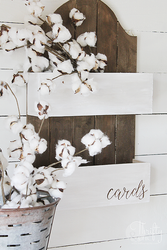
DIY Rustic Chic Wedding Card Holder
Posted by DecoArt on Jun 8th 2017
Wedding season is upon us! I know so many people who get married in May and June! We all know that cards are usually the gift of choice when it comes to wedding presents, so here's a cute way to corral them all at the ceremony!
Items Needed:
- Two Tier Plant Holder Or Wall Shelf
- Chipboard Letters Or Printer And Paper To Transfer Lettering
- Painters Tape
- Brushes
Instructions:
Gather your supplies.


Since the Chocolate will be painted first, tape off the areas where the White Pearl will be so the Chocolate doesn't bleed onto the wood.

Paint two coats of the Chocolate onto back part of the shelves.

Once the Chocolate is dried, switch the painters tape and place it on top of the Chocolate leaving the entire area for the White Pearl exposed. I ended up painting a base coat of white first.

Then I used the White Pearl as the top coat. You can skip the base coat step and just use 2-3 coats of the Pearl White instead.

Find a font that you like and print out the word "cards" backwards onto printing paper. The size I used was 8" wide by 4" high.

Line up where you want the word and cut the corners to have it fit. Make sure it is straight and level.

Place the paper ink side down onto the wood. Using the end of the paint brush, trace the words, pressing firmly.

This is what it should end up looking like. This is the result from most of the lettering being dried out already before transfer. It shows that you don't have to use a lot of water in the previous step.

Using a thin bristled or tapered paintbrush, dip in Chocolate and trace the letters. I ended up doing about 3 coats of this. I noticed that if the paint is thicker, it helps stay on the Pearl White better. So, have the paint set for about 5-10 minutes before dipping the brush into it.

You can use both shelves for the cards. The top shelf full of flowers of plants or cotton as I have it displayed. The sky's the limit!

The color of the Metallic Chocolate is beautiful in real life. The wood looks stained, but it actually has a pretty sparkle to it with gold undertones.

Here's the idea with some cards.

If you choose not to do the transfer method for "cards", you can paint some chipboard or wood letters and hot glue them onto the shelf also.


