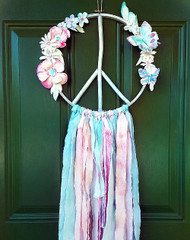
Boho Peace Sign Door Hanger
Posted by DecoArt on Jun 18th 2020
Make a boho-inspired door or wall hanger using Americana® Acrylics and SoSoft® Fabric Paints.
SUPPLIES
- water container
- stylus or pencil
- sandpaper
- scissors
- hot glue gun
- small round brush
- 3/4" oval brush
- tracing & transfer paper
- scissors or box cutter
- bowl
- branch
- watercolor paper
- 12" embroidery hoop
- 1 yard of white cotton fabric
INSTRUCTIONS
NOTES:
The white cotton fabric I chose had a white paisley design. It added some visual variation.
- Gather the materials.
- Measure and cut the branch to fit in the embroidery hoop (one longer branch vertically and two smaller pieces for the peace sign). Sand any rough surfaces.
- Affix the three pieces of branch inside the embroidery hoop with hot glue. (See photo.) Allow to cool.
- Paint the entire surface with Cobblestone. Allow to dry.
- Dry-brush Snow White onto the sign until almost completely white, leaving some areas exposed.
- Cut the fabric in half. Wet both pieces of fabric and squeeze out the water.
- Lay out the first piece of fabric like folding a paper fan.
- Mix Bright Coral with water in a bowl. (The more paint mixed in the more intense the color.) Roll up the folded fabric and dip the edge into the watered paint. Using Red Pepper and water, mix another bowl and dip the other edge.
- Wring out the fabric, spread, and hang to dry.
- With the second piece of fabric, twist and dip into a pre-mixed bowl of Indian Turquoise and water. Wring out.
- Open the fabric and add more paint with a paintbrush. Wring out again to get a tie-dye effect. Hang to dry.
- When the fabric is completely dry, snip end of fabric with scissors every 1" to 2". Tear into strips.
- You will have a variety of colors and sizes.
- Loop tie the fabric strips onto the bottom of the embroidery hoop, alternating colors.
- You can make it as thick or thin as you like.
- Trace the provided poppy pattern or free-hand the shapes onto watercolor paper. Fill in the shape with water and then add Santa Red to the wet surface.
- Continue to do this adding Cactus Flower and Bahama Blue. Allow to dry.
- Using the same technique, use Bahama Blue and Moody Blue mixed with Santa Red for the forget-me-not shapes. Add Cactus Flower to the top pieces and Bahama Blue for the leaf shapes. Allow to dry.
- Paint on Cactus Flower and Santa Red for the centers of the daisies and a light wash of Bahama Blue to the edges of each flower. Allow to dry.
- Before painting the butterfly shapes, cut down center line that is labeled "CUT".
- Fold on each line that is labeled "FOLD". Cut out the butterfly shapes and paint with Cactus Flower, Bahama Blue, Santa Red, and Moody Blue. Allow to dry.
- Cut out all the shapes and lay together the pieces. Using hot glue, affix the adjoining pieces. Let cool.
- When the glue is cooled, begin to gently the shapes and petals gently to give them a life-like appearance.
- Decide the placement of the flowers and butterflies and hot glue them to the sides of the peace sign.
- Hang inside for a year-round decoration or hang on an outside door to brighten your day.


DOWNLOADS
Butterfly PatternDaisy Pattern
Forget Me Not Pattern
Poppy Pattern

