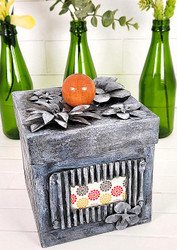
DIY Faux Oxidized Tin Decorative Box
Posted by DecoArt on Feb 25th 2021
Turn a papier mache box into faux tin metal using DecoArt's Oxidized Tin Designer Finish kit.
SUPPLIES
- hot glue gun
- X-Acto® knife
- 6" piece of corrugated cardboard
- palette knife
- papier mâché box
- scrapbook paper
- 1/2" oval brush
- 3/4" paintbrush
- watercolor paper
- wooden doll head
INSTRUCTIONS
- Gather a papier mâché box and a small piece of corrugated cardboard.
- Find a wooden ball, wooden doll head or any wood piece to be the topper of the box. Paint the wooden ball with Burnt Sienna and let dry. Apply a shiny varnish or Gloss Decou-Page to give the sheen of finished wood. Allow to dry.
- Draw or print out the provided flower patterns onto cardstock or watercolor paper. Cut out the flower pieces with scissors. Form or bend the paper to give a 3D look.
- Cut out a small piece of corrugated cardboard in the shape of a label holder to fit on the side of the box. With an X-Acto knife, cut out a window for the label or a piece of printed paper to show through.
- Paint all pieces of flowers and the box with Neutral Grey with a soft brush. Let dry completely.
- Paint all of the grey pieces with a coat of Tin. Allow to dry.
- Glue the flower pieces together with hot glue. Place dots of hot glue onto the edges of the label to give the look of metal pins. Paint dots with Tin once the glue is cooled. Glue the flowers and wooden topper to the lid of the box and the label holder to the side of the box.
- Mix Texture Sand Paste and Tin 1:4. Apply the mix sparingly to all parts of the box with a palette knife. Allow to dry.
- Mix Lamp Black with water to create a wash and brush onto box. Allow to seep into the textures and recessed areas. Allow to dry. Create a watered down mix of Snow White and brush onto the raised texture surfaces of the box. Allow to dry.
- If needed, reapply Tin onto some areas of the box to give sheen to the matte surface.
- Make sure the flowers have the metallic sheen of the Tin as well to really emphasize the metallic look.
- You can use this Designer Finish Oxidized Tin on a variety of surfaces and even thrift store finds to create something brand new.


