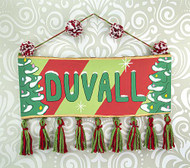
Family Name Wooden Holiday Sign
Posted by DecoArt on Nov 25th 2020
Make a playful family sign for this holiday season with Americana® Acrylics.
SUPPLIES
- scissors
- ruler
- soft cloth
- liner brush
- paper
- masking tape
- twine, jute, or string of choice
- palette knife
- lettering stencil
- eye hook
- small flat brush
- tassels
- wooden plank
- color pencil
- pompoms
INSTRUCTIONS
- Wipe down the wooden board with a soft cloth to remove any loose dirt or bark. Paint the raw edges with Soft-Touch Varnish to seal the bark. Allow to dry completely.
- With a ruler and a light colored pencil, draw on diagonal lines. (Spacing is your preference.)
- Plan the area of the text. (Leave room for trees on each side of the sign.) Place masking tape around the text area. Place paper within the area. Cut the paper evenly, depending on the number of letters. (Or use a pre-made stencil.)
- Use any font you like to draw on the letters, one within each box. Cut out the letter; place back onto the wooden board; and trace each onto the surface.
- Remove the tape. Trace the provided retro tree pattern onto each side of the sign using a light colored pencil.
- Paint the letters with Holly Green, using a small flat brush. Allow to dry.
- Paint alternative diagonal stripes with Santa Red and Hauser Light Green. (See photo for placement.) Allow to dry.
- Paint the retro trees with Holly Green. Paint the bulbs with Bubblegum Pink, Cadmium Yellow, Jadeite Glass ,and Bahama Blue. Outline the text and tree drawings with Black Opaque Glass Marker. (Optional: use Lamp Black and a liner brush.)
- Paint snow patterns with Snow White. (Optional: Plan out where you want the snow patterns to go on the limbs/letters by cutting white paper and placing on each branch or letter. Trace around cut outs and paint with Snow White.) Allow to dry.
- With a palette knife, spread Snow-Tex onto the painted Snow White areas. Allow to dry.
- Paint all of the snow areas with Clear Comet Ice. Allow to dry.
- Screw two eye hooks onto the top of the sign for the hanging string.
- Use any type of string or twine to make a twisted hanging string. (I used the same yarn that I used to make tassels, red and green.)
- Screw the eye hooks into the bottom of the sign (as many as needed for tassels. I did nine.) Tie on pre-made tassels or make your own using the DIY tassel patterns provided.
- Attach the pompoms (use pre-made or make your own using the attached DIY pompom patterns) to the hanging string. (I made and attached four large pompoms to the hanging string.)
- Customize the family sign even more by adding your favorite colors.
- Hang the sign inside for a personalized festive decoration.
- You can also use the sign outside on a door: just coat the entire plaque surface with Soft-Touch Varnish.


DOWNLOADS
Diy Pom Pom Step PicturesDiy Tassel Step Picutures
Pom Pom Diy Step Instructions
Retro Christmas Tree Pattern
Tassels Diy Step Instructions

