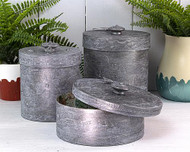
Decorative Tin Boxes
Posted by DecoArt on Apr 26th 2021
Store items in a vintage inspired decorative tin box. These are easy to create using the Oxidized Tin Designer Finishes™ technique kit.
SUPPLIES
- scissors
- sponge brush
- small container
- E6000 Glue
- round papier mâché box
- craft paper
- cording
- stickers
- paint stir sticks
- gems
- all-purpose glue
- die cuts
- dimensional glue
- satin ribbon flowers
INSTRUCTIONS
NOTES:
Choose small containers to mix paint, if you want to keep the remaining mixes for later.
- Start with plain papier mache boxes.
- Adhere the die cuts and the paper border die cuts to the papier mache boxes with glue. Apply the stickers. (It doesn’t matter if none of these items match, because all will be covered over to look like real oxidized tin when complete.) Glue on the gems to the centers of the flowers where you want to show more dimension. (I also went over some items with dimensional glue to add more dimension and depth.) Don't forget to add flowers with gems to the knobs also.
- Follow the Designer Finishes label instructions: Apply a basecoat of Oxidized Tin to the box surface with a sponge paintbrush. Allow to dry.
- Apply the Oxidized Tin basecoat to the knobs and butterflies that will be used on top of the lids.
- Mix Oxidized Tin with Texture Sand Medium 4:1 in a small plastic container. Stir. (I used a 1/2 teaspoon measuring spoon.) Apply randomly with a sponge brush to all surfaces, knobs, and butterflies for lids. Allow to dry.
- Mix 4:1 water with Black Vintage Effect in another plastic container. Brush randomly the mix over all surfaces. After a few minutes, go back over with the same brush and smoothed out the “wash” areas. Allow to dry.
- Mix 4:1 water with White Vintage Effect in a third plastic container. Brush randomly the mix over all surfaces. After a few minutes, go back over with the same brush and smoothed out the “wash” areas. Allow to dry.
- Glue the knobs onto the lids with a heavy duty adhesive.
- If finishing the insides, cut craft paper and glue to to the insides and bottoms of the boxes. Glue on coordinating satin cording and a satin ribbon flower where the cording was cut so that it’s not noticed.
- Bend some butterflies to round out the wings and glue in place.


