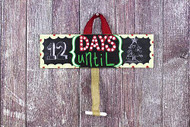
"Days Until" Christmas Chalkboard
Posted by DecoArt on Dec 2nd 2014
Keep your home or office up to date with holiday plans on this eye-catching chalkboard.
SUPPLIES
- water container
- palette or plastic plate
- paper towels
- tracing paper
- transfer paper
- scissors
- #6 flat brush
- chalk
- hot glue gun and glue sticks
- #12 flat brush
- #1 liner brush
- ribbon to match
- #1 round brush
- wooden plaque
INSTRUCTIONS
NOTES:
Let dry completely between painting steps.
- Use a #12 flat brush to basecoat the plaque with Black Chalkboard Paint. Brush the first coat horizontally and let dry completely before rinsing brush and applying a second coat vertically.
- Use a pencil and the tracing and transfer papers to trace and transfer the pattern to the plaque.
- Use a #1 round brush and Lemonade to paint the border. Rinse brush.
- Use a #1 liner brush and Wasabi Green to outline the border. Rinse brush.
- Use a #6 flat brush and Santa Red to fill in word "DAYS". Rinse brush. Use the handle end of a #12 flat brush dipped in Santa Red to add dots to every other scallop on the border. Wipe off handle.
- Use the handle end of a #12 flat brush dipped in Snow White to add dots to "DAYS" and also to the remaining scallops. Wipe off handle.
- Use a #1 round brush and Snow White to paint the brackets. Rinse brush.
- Use #1 liner brush and Kelly Green to fill in the word "UNTIL" and outline the brackets. Rinse brush.
- Measure off ribbon of choice to hang the sign at the top and cut with scissors.
- Measure another ribbon of choice for the chalk to hang from at the bottom of the sign; cut ribbon with scissors.
- Follow Chalkboard Paint label directions for cure times. Once fully cured, turn chalk on its side and rub to condition chalkboard. Wipe off with a paper towel or chalk eraser.
- Use a hot glue gun to attach the ribbon and tie around the piece of chalk. Use a hot glue gun to attach the ribbon at the top for hanger.

