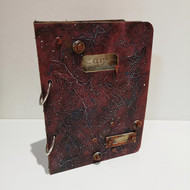
Curio Bound Book
Posted by DecoArt on Apr 17th 2019
Items Needed:
- Americana Decor Chalky Finish Paint 2oz - Rouge (ADC07-30)
- DecoArt Media Mediums and Specialty Products - Texture Sand Paste (DMM23-71)
- DecoArt Media Mediums and Specialty Products - Gesso - White (DMM18-71)
- Vintage Sepia Ink
- Selection Of Flat Brushes
- Tissue Paper
- Water Spritzer
- Low Tack Tape
- Craft Knife
- Heat Tool
- Tando Creative Planner
Instructions:
Step One: As with every project, begin with laying out your design. Once you are happy with the look – take a photo for reference.

Step Two: For your texture, start by scrunching up a piece of tissue paper roughly the same size as your book cover. Flatten out your tissue paper and begin gluing it to your book. I find it easier to work in sections; add a layer of Decou-Page Glue in a small area and stick down part of your tissue paper. Work over the whole of your cover, once all in place – add a layer of glue over the cover to seal.

Step Three: Once the glue is dry, coat the cover and all internal sections with a layer of Gesso. You can add a small amount of water to the Gesso to ensure it flows, this will help you paint in all of the creases caused by the tissue paper.

Step Four: Paint the covers in a layer of Chalky Finish Rouge. To give a more natural effect, go over areas to build up colour intensity – this will give you a mottled effect.

Step Five: Next, create a wash using Paynes Grey. Start with a light wash over the surface of the covers and build the intensity until you reach a depth of colour you are happy with. You will find the wash will pool in the creases created by the tissue paper.

Step Six: Add staining effects to your covers by adding patchy washes of both Transparent Yellow Iron Oxide and Cobalt Turquoise Hue, by adding these two washes at the same time you create further colours where the washes meet.

Step Seven: Set the covers to one side and begin working on your internal dividers. Start with a layer, on both sides, of Titan Buff.

Step Eight: To add interest to your internal divides, and to give them a more paper page look, stamp images over the dividers using Versafine Sepia. For mine, I have chosen images of diagrams along with script text. I have also blocked out the area which will show through the window of the cover, using low tack tape.

Step Nine: Give your dividers a distressed look by soaking the edges in water, this allows you to peel back layers of the greyboard and manipulate them giving curled edges. Add a wash of Burnt Umber, intensify the washes to the edges and add splatters too.

Step Ten: For the embellishments, begin by adding patches of Textured Sand Paste roughly across the surface. Once the paste is dry, use a fine brush to paint all your embellishments in a layer of Metallic Silver.

Step Eleven: Begin adding a grungy look to your embellishments by adding layers of washes. Start with Paynes Grey, moving on to Brunt Umber, then Yellow Oxide and finally Quinacridone Gold. As with your previous washes, build the level of intensity until you are happy with the look.

Step Twelve: Add neat Quinacridone Gold in patches across your embellishments, use your heat tool to dry them quickly causing the paint to bubble and add more texture.

Step Thirteen: To finish, lightly dry brush your covers in Gesso to pick out the highlights. This adds great contrast and shows up the textures created by the tissue paper. I have also added a few white splatters for interested. Finally, I have glue my embellishments in place.


