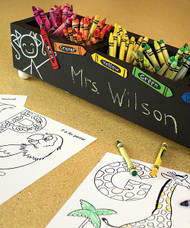
Chalkboard Crayon Caddy
Posted by DecoArt on Jul 31st 2016
Round up and label crayons with this clever work station/storage caddy.
SUPPLIES
- water container
- palette or plastic plate
- paper towels
- tracing paper
- transfer paper
- sandpaper
- liner brush
- 3/4" flat brush
- #8 round brush
- craft sticks
- handsaw
- white pencil
- E6000 Glue
- wooden balls
- divided box
INSTRUCTIONS
NOTES:
Let dry completely between painting steps.
- Using a 3/4" flat brush, paint three sides (one long side and two ends) plus the inside of the divided box in Black Tie. Using a 3/4" flat brush, paint the other long side (front) in Black Chalkboard Paint, applying one coat horizontally and one coat vertically.
- Trace the boy and girl pattern onto the edges of the front with a white pencil. (Refer to photo for placement.) Use a #8 round brush to paint the boy and the girl in Cotton Ball.
- Use the handsaw to cut six craft sticks 3" long. Use sandpaper to smooth out one end and to make a point on the other end.
- Use a #8 round brush to paint the "crayons", one in each of the following colors: Lipstick, Pumpkin Patch, School Bus, Leprechaun, True Blue, and Iris. Trace and transfer the crayon pattern and, using a liner brush, add details in Black Tie. Using a liner brush, add the color names in Cotton Ball. (Free-hand in "kid" style.)
- Use E6000 Glue to adhere the crayons in place. (Refer to photo for placement.)
- Optional: Use a 3/4" flat brush to paint four wooden balls in Cotton Ball. Use E6000 Glue to adhere in place. (Refer to photo for placement.)


