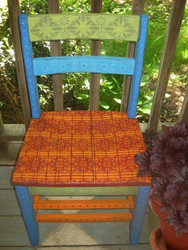
Colorful Stenciled Boho Chair
Posted by DecoArt on Feb 18th 2016
Turn a plain side chair into a work of boho art with Americana® Stencils and Americana Decor® Chalky Finish.
SUPPLIES
- ruler
- pencil
- tape measure
- wooden chair
- painter's tape
- 1" flat brush
- 1/2" flat brush
- sanding sponge
- hole punch
- plain white copy paper
- cutting mat
- craft knife
- clean cloth
- drop cloth
- 1/2" pouncer
- 1/4" pouncer
- hairdryer
INSTRUCTIONS
NOTES:
Let dry completely between painting steps.
- Sand off any loose paint with a sanding sponge and wipe down the chair. Use a hairdryer to dry, if desired.
- With a 1" flat brush, paint the entire chair in Carbon.
- With a small brush, paint the rungs of the chair in Heritage.
- Apply a coat of Treasure to the lower slat on the back of the chair using a small brush.
- On the upper slat on the back of the chair, apply a coat of New Life. Paint the legs and upper sides of the chair in Legacy.
- Paint the lower panels of the chair in Enchanted. Paint the chair seat in Rouge.
- With a medium-grit sanding sponge, sand all the corners and edges of the chair, letting some of the Carbon show through. Start light and re-work any areas as needed.
- With a measuring tape or ruler, find the centers of the upper chair slats and mark lightly with a pencil. (Do this on the lower panels as well.) Position the Americana Traditional Medallion Stencil on the center of the upper slat. Use painter's tape to hold down the stencil. With a sponge pouncer, apply Enchanted. (Use a hairdryer to speed up drying process, if desired.) Repeat on both the front and back to achieve desired look.
- Using a craft knife and cutting mat, cut out the Americana Kaleidoscope Border Stencil to make positioning easier. Position the stencil in the center of the lower back slat and tape down. With a pouncer, apply New Life. Use a hairdryer, if needed. Repeat for the back of slat and all sides of the chair.
- Mark the center of the seat using a ruler and pencil. Position the Patio Paint Home & Garden Reusable Stick-On Latin Inspiration Stencil in the center of the seat; tape it down. With a pouncer, apply Heritage. Repeat the pattern across the chair to achieve the desired look. For the edges of the seat, tape the stencil down and let it drape over the edge.
- Trim a piece of paper to fit the length and width of the chair legs and rungs respectively. With a 1/4" hole punch, make a line of dots. Tape the dotted strip down one side of the chair leg. Apply Treasure with a pouncer. Repeat for the front, back, and sides.
- Place the next strip on a chair rung and apply Rouge with a pouncer. Apply to all fronts of the rungs.
- Seal with your choice of Clear Crème Wax or Americana Matte Spray Finish. (If using Clear Crème Wax, apply with Waxing & Finishing Brush.)


