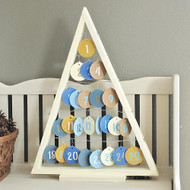
Tree Advent Calendar with Wooden Ornaments
Posted by DecoArt on Dec 7th 2015
Commemorate and decorate the run-up to Christmas with an Advent calendar made with Americana® Acrylics.
SUPPLIES
- water container
- palette or plastic plate
- paper towels
- sandpaper
- saw
- 1" flat brush
- wood glue
- foam brush
- vinyl
- Silhouette electronic cutting machine
- drill and small drill bit
- small nail and hammer
- needle nose pliers
- wooden board
- wire cutters
- craft wire
- wooden shapes
INSTRUCTIONS
NOTES:
Let dry completely between painting steps.
- Lightly sand the wooden ornaments. Wipe away any sanding dust with a damp paper towel.
- Paint the ornaments using a foam brush and the following colors: Baby Blue, Sapphire, Williamsburg Blue, Glorious Gold, and Brown Sugar. Paint both sides of the ornaments with two coats each, allowing the paint to dry completely between coats.
- After the ornaments have dried, lightly sand the edges to give the ornaments a distressed look.
- Cut out the numbers with a digital craft cutter in the font of your choice. (We used a Silhouette electronic cutting machine.) Use a vinyl color to coordinate with the ornaments.
- Apply the vinyl numbers to the ornaments in a random pattern of color. If desired, apply a layer of Americana Matte Decou-Page over the vinyl numbers to ensure adhesion.
- Construct the Christmas tree stand: Cut a 1" x 2" piece of wood into a 22" piece, a 23-5/8" piece, and a 17-1/4" piece. Be sure to angle the ends to ensure everything fits together seamlessly. The base of the tree is a 1" x 4" x 9" piece of wood. Assemble together using nails and wood glue.
- Sand the Christmas tree stand. Wipe away any sanding dust with a damp paper towel. Paint the stand Buttermilk using a 1" flat brush
- To add the craft wire to the tree, drill two holes straight across from one another. Thread the craft wire through the holes.
- Using a pair of needle nose pliers, twist the end of the craft wire to hold it in place on both sides. Repeat these steps until five wires are strung across the tree.
- Add metal Christmas tree ornament hangers onto the numbered wooden disks and hang them onto the wires in numerical order.


