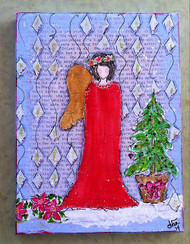
Christmas One Winged Angel with Saying
Posted by DecoArt on Dec 1st 2014
Create a Christmas one winged angel with saying "Peace...let it begin with me" using the Media line.
SUPPLIES
- water container
- palette or plastic plate
- paper towels
- permanent ink pen
- tissue paper
- black Sharpie® marker
- brushes
- foam brush
- canvas
- pen
- decorative rubber stamp
INSTRUCTIONS
NOTES:
Let dry completely between painting steps.
- With foam brush, spread a good amount of Decou-Page onto canvas. Cut your tissue paper down to your canvas size. Re-apply Decou-Page over entire face of canvas and quickly place your tissue paper down and rub lightly to make sure it is adhered to canvas. Lightly decou-page over tissue paper to seal. Let dry.
- With foam brush, make a mixture of 1 teaspoon(approximate) of gesso and 1 teaspoon(approximate) of water onto plastic plate. Quickly apply a light layer of mixture onto canvas over tissue paper, pouncing a little darker around the edges of your canvas. Here I mixed gesso with a touch of Primary Cyan(blue), to achieve a light periwinkle blue.
- With angle brush and Media Gesso, draw out your image onto your canvas. Freehand the angel, Christmas tree, flowers and wing.
- Using a plastic plate, mix one drop of Naphthol Red Light and a drop of Primary Magenta, paint the gown, bow around pot and flowers on the ground-mix more paint together if needed. Paint the flowerpot Traditions Raw Umber and lightly blot with damp paper towel to give the flowerpot a highlighted spot. Paint in the one wing with this same color, Raw Umber, then paint over the raw umber with multi surface Metallic Gold.
- Paint tree with bouncy motion with Yellow Green Light as well as the flower leaves on ground. Use Faber-Castell dark green marker to had spots of color around the lighter green and rub quickly with your finger. This just mixes the two colors slightly for tree color variation. Using the back of any brush, make dots in flower centers with Primary Yellow, then place tiny dot with black sharpie.
- Paint small ornament dots and one heart on tree with Traditions Red Violet. With detail brush, touch with Titanium White a tiny dot into each ornament.
- 6. Paint face and neck of angel flesh color, using an extreme small amount of each of the following colors mixed on a plastic plate: Naphthol Red Light and Titanium White, mix. Add in Primary Yellow and then Yellow Green Light. This should make flesh color. For cheeks, add a small amount of Primary Magenta. With detail brush, brush two small spots on face of angel where cheeks are.
- With a detail brush, paint Burnt Umber for hair. Add a little of Metallic, Carbon Black and Titanium White throughout head to create a hairdo.
- With a detail brush and gesso, create a flower garland on the angels head. Dab 3 flowers with red/magenta mixture. Dab a touch of yellow green light paint and Faber-Castell dark green marker for color variation.
- Using Faber-castell gold marker-rub onto cross stamp and stamp 3 crosses into the one wing.
- Take a harlequin stencil and place onto canvas. With gesso on a brush, lightly paint some of the diamonds randomly around the canvas.
- Outline all images on canvas with fine black sharpie. Add a bit of white around the images using a Signo white ink pen.
- Using Interference Green, dab the tip of your finger into this paint and rub a little in the middle of each diamond made from the Harlequin stencil. Using a detail brush, add three small dots to each diamond using the red/magenta mixed paints.
- With Titanium White and a brush, add a splash of snow like effect by tapping the paint filled brush onto another brush. Make it snow all around the canvas.
- Optional**write or type out words, quote, verse or phrase onto canvas. (Decou-page down if typing your words) Outline with black sharpie.
- Rub the edges of the canvas with a few of the colors used throughout to frame the piece.

