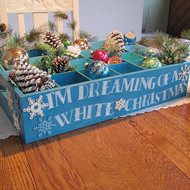
Stenciled Christmas Carol Ornament Crate
Posted by DecoArt on Nov 9th 2015
A wooden crate becomes a "dreamy" box for storing holiday ornaments.
SUPPLIES
- water container
- palette or plastic plate
- paper towels
- sandpaper
- E6000 glue
- pencil
- painter's tape
- #3 round brush
- cosmetic sponge
- 2" foam brush
- rectangular wooden crate
- 1" foam brush
- 1" pouncer
- wooden shapes
INSTRUCTIONS
NOTES:
Let dry completely between painting steps.
- Lightly sand any rough edges of the crate with sandpaper. Wipe away any sanding dust with a damp paper towel.
- Using a 1" foam brush, paint the outside and underneath the crate in Treasure.
- Using a 1" foam brush, paint each opening of the crate a different, random color: Use Baby Blue, Coastal Waters, Turquoise Waters, and Waterfront. For even more color, mix the colors to create new hues. Paint two coats on each opening, allowing the paint to dry completely between coats. Use a #3 round brush to reach into the corners.
- Optional: Lightly sand the edges of the crate for a distressed look. Concentrate on the areas that would show wear more naturally, such around the handle areas. Wipe away any dust with a paper towel.
- Choose a holiday phrase or greeting. Determine the layout before stenciling the design. Using a pencil, lightly draw the lines where the lettering will go.
- Position the DecoArt Personally Yours Stencils Urban Ink Sea Dog Stencil on the front of the crate. Using a stencil brush or cosmetic sponge, apply Lace. Allow to dry before moving on to the next letter. If needed, use painter's tape to cover up any lettering next to the desired letter.
- If desired, lightly sand over the lettering.
- Seal the crate using Americana Decor Light Satin Varnish.
- Using a foam pouncer, paint the wood-cut snowflakes in Lace.
- While the paint is still wet, sprinkle on Crystal Glamour Dust Sprinkle-On Glitter. Tap the snowflake to shake off any excess glitter.
- Using E6000 Glue, adhere the snowflakes as desired onto the side of the crate.

