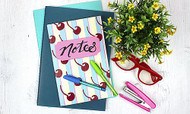
Back-to-School Cherry Notebook
Posted by DecoArt on Aug 28th 2018
Let a notebook stand out with stenciling of Americana® Multi-Surface Acrylics.
SUPPLIES
- scissors
- 1" painter's tape
- cosmetic sponge
- black Sharpie® marker
- construction paper
- small brush
- medium brush
- all-purpose glue
INSTRUCTIONS
NOTES:
Let dry completely between steps.
Some steps may require several coats of color.
Use a cosmetic sponge to apply the stencil with more ease.
- Mark off a striped pattern with painter's tape. Paint the first set of stripes with Vanilla Shake.
- Remove the painter's tape and cut a single stripe out of construction paper. Using the straight side of the construction paper as a guard, mark out and fill the Baby Blue stripes. (Don't worry too much about messiness; the next step will take care of cleaning up the line.)
- Fill in the remaining stripes with Ballerina.
- Mix Ballerina with Red Barn to make a darker pink. Use a small brush to paint stripes between the Baby Blue and Ballerina stripes.
- Using the cherry stencil from the Dessert Anyone stencil and a cosmetic sponge, apply Red Barn.
- Cut out a rectangle in a complimenting size of construction paper and shape the corners with a curve inward. Use a black marker to write the word "Notes" and glue the paper to the notebook. (You may also want to go over the marker with Black Tie.)


