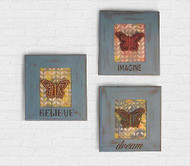
Butterfly Inspirational Frame with Chalky Finish
Posted by DecoArt on Jul 25th 2016
Keep your goals in mind with coordinated inspirational frames created with Americana Decor® Chalky Finish™.
SUPPLIES
- water container
- palette or plastic plate
- paper towels
- sandpaper
- painter's tape
- 2" flat brush
- baby wipes
- cosmetic sponge
- glass cleaner
- brayer
- stencil of your choice
- watercolor paper
- Gelli Gel Printing Plate
- embellishments of choice
- E6000 Glue
- detail brush
- wooden frames
- candle wax
INSTRUCTIONS
NOTES:
Let dry completely between painting steps. If paint feels cool to the touch, it is not fully dry.
- Take off the backing and glass from the frames. Thoroughly clean the surfaces with glass cleaner.
- Load a 2" flat brush with Rustic. Paint the frame fronts; allow to dry; and then paint the backs and sides.
- In the areas where you would like the Rustic to show through, rub with clear candle wax.
- Brush the front and sides of the frames in Escape.
- Lightly sand the frames in different directions until the desired distressed look is achieved. Wipe down the frames with a paper towel.
- Tape "believe" down from the Urban Ink Spirited Stencil. Using a cosmetic sponge, apply Traditional Burnt Umber to the stencil. While the paint is still wet, remove the stencil carefully.
- Repeat the previous step on the other frames with the words "dream" and "imagine".
- Once the stenciling is completed, use a detail brush to connect the lines of each letter with Traditional Burnt Umber.
- With a 2" flat brush, apply Ultra-Matte Varnish to all frames. Set aside to dry.
- Using a 5" x 7" or larger gelli plate, squeeze out small amounts of Banana Cream, Slate Grey, Victorian Blue, and Terra Coral onto a plate. For each background, use all colors, but keep one color the focus on each frame. Roll out paint with a rubber brayer.
- Place a stencil of choice over the gelli plate.
- Place a sheet of watercolor paper on top of the stencil. Rub with hands over the paper, lift, and set aside. Repeat for the other two backgrounds.
- Cut paper to the same size as the frame.
- Brush Paper Decou-Page onto the frame backing. Position the paper and remove any wrinkles or bubbles. Apply another layer of Decou-Page on top.
- Apply Rustic to each butterfly. Let dry. Use sandpaper or a baby wipe to remove paint from raised edges of butterfly.
- Attach the frame backing to the frame. Adhere the butterflies to the center of the frame with E6000 Glue according to package instructions.


