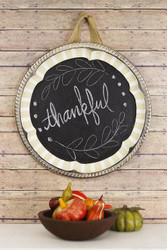
"Thankful" Chalkboard Decor Tray
Posted by DecoArt on Nov 3rd 2014
The tray's chalkboard finish allows you to change the tray's message, even turn it into a menu board.
SUPPLIES
- palette or plastic plate
- paper towels
- rubbing alcohol
- scissors
- burlap ribbon
- 3/4" flat brush
- #10 flat brush
- chalk
- silver tray
INSTRUCTIONS
NOTES:
Let dry completely between painting steps.
- Clean the tray with rubbing alcohol. Let dry completely.
- Use a 3/4" flat brush with Timeless and carefully paint the tray's inner border. Rinse the brush; let the tray dry completely.
- Use a 3/4" flat brush to apply a first coat of Glass Chalkboard. Rinse brush.
- Use a #10 flat brush with Whisper to paint stripes around the border.
- Use a 3/4" flat brush to apply a second coat of Glass Chalkboard. (Follow label instructions for drying times.) Rinse brush.
- Use scissors to cut the burlap ribbon and hot glue it to tray back.
- Before using the tray as a chalkboard, follow label instructions and condition before use.

