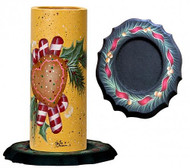
Painted Christmas Candle and Candleholder
Posted by DecoArt on Dec 1st 2014
This decorative painting project can be the center of your holiday decorations.
SUPPLIES
- water container
- palette or plastic plate
- paper towels
- stylus or pencil
- tracing paper
- rubbing alcohol
- fine-grit sandpaper
- 1/4" flat brush
- #6 filbert brush
- 3/8" angle brush
- #6 flat shader brush
- tack cloth
- grey and white graphite paper
- 1/2" blender mop
- palette knife
- 5/0 liner brush
- battery-operated tealight
- 1" wash brush
- wax candle sleeve
- #12 filbert brush
- #8 flat shader brush
- 20/0 mini script liner brush
- #8 dry brush
- 1/4" mop brush
- #0 script liner brush
- 6" round wooden candleholder
INSTRUCTIONS
NOTES:
Follow all manufacturer's label instructions for proper product usage. Use only battery-operated tealights inside the candle sleeves.
Do not mix Paint Adhesion Medium to paint on the wooden candleholder surface.
Add a few drops of Easy Float to clean water to help with the shading and highlighting effects.
- CANDLE: Mix equal amount of Paint Adhesion Medium with each color being used and mix well with a palette knife.
- Wipe the candle sleeve with rubbing alcohol. Use a 1″ wash brush to apply a coat of Paint Adhesion Medium to the candle and let dry completely. Basecoat candle with Golden Straw. Let dry and repeat until fully covered. Spatter Asphaltum, Avocado, and Snow White on the surface. (See helpful hints for splattering technique.) Let dry.
- Trace and transfer the main outline of the pattern.
- CANDLEHOLDER: Sand any rough edges along the sides only. Wipe off dust particles using a tack cloth. Use the wash brush to basecoat the surface Lamp Black. Let dry.
- Repeat the sanding step for smoother surface and apply a second coat of Lamp Black. Let dry.
- CANDLE: Use a #6 filbert brush to basecoat the candy canes Snow White. Let dry.
- Use a 1/4″ flat wash brush to basecoat the candy cane stripes Red Iron Oxide. Let dry and re-coat with Tuscan Red. Float along the edges with Black Plum. Highlight the center area and float the wrapper for the round candy with Snow White. Let dry and reapply a highlight with Ice Crystal.
- Use a #12 filbert brush to basecoat the cookie Honey Brown. Dry-brush a highlight in the center area with a mix of Honey Brown and Snow White.
- Add more highlights at the top right of the cookie with Snow White. Float along the edge with Milk Chocolate. Outline the icing with Electric Pink. Let dry. Use a stylus to apply dots of Celebration Pink.
- Let dry and reapply with Glamour Glitter Paint: use Ice Crystal on Snow White; Celebration Pink on Electric Pink; and Sizzling Red on Tuscan Red.
- Use a 1/4″ flat wash brush to basecoat the holly with Avocado. Dry-brush the center area with a mix of Avocado and Snow White. Let dry.
- Use a 3/8″ angular brush to float down the bottom center and along the edges of the holly with Evergreen. Use a 5/0 liner brush to outline the outside edges and veins with a mix of Avocado and Snow White.
- Repeat the above step with Snow White.
- Use a #0 liner brush to free-hand in the needles with an inky consistency of Midnite Green, first layer; Hauser Light Green, second layer; and Snow White, third layer. (Clean the bristles after each color being used.)
- Let dry and dot in berries with Tuscan Red. Let dry and reapply with Sizzling Red.
- CANDLEHOLDER: Trace and transfer the main circle.
- Use a #0 script liner brush to apply needles with an inky consistency of Hauser Light Green for the first layer. Clean brush and apply a second layer of Citron Green. Clean again and apply a third layer of Lemonade. (Apply the strokes from one side of line to the other and work back and forth until the circle is complete.) Let dry.
- Transfer the ribbon and berries.
- Use a #6 flat shader brush to basecoat the ribbon Red Iron Oxide. Let dry and apply a second basecoat of Tuscan Red. Let dry.
- Use a #8 flat shader brush and float the ribbon ends in Deep Burgundy. Let dry. Darken the floats with Black Plum. Let dry.
- Dry-brush the ribbon center with Cadmium Red. Leaving the brush dirty, apply a second dry-brush with Snow White.
- Use a #20/0 mini script liner brush and Champagne Gold to outline the outer edge of the ribbon.
- Re-apply very little needles onto the top of a few ribbons.
- Use a #6 filbert brush to basecoat the berries with Camel. Let dry.
- Float the bottoms of the berries with Honey Brown. Let dry. Darken the floats with Asphaltum. Apply a highlight on the top with a mix of Camel and Snow White.
- To finish, you can leave the candle as is or apply a coat of Paint Adhesion Medium for a shinier finish. Apply one or two coats of DuraClear Matte Varnish to the candleholder.

