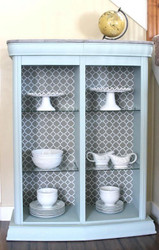
Entertainment Center Turned into a Bookcase
Posted by DecoArt on Jun 4th 2015
Modernize that old entertainment unity into a chic, classic bookshelf using Americana Decor Chalky Finishes
SUPPLIES
- water container
- paper towels
- sandpaper
- 2" flat brush
- saw
- staple gun
- wood glue
- primer (optional)
- contact paper
- wooden board
- drill gun
- drill bits
- wood stain
- light bulbs
- clamp
- entertainment unit
- jigsaw
INSTRUCTIONS
NOTES:
Let dry completely between painting steps.
Be very careful when applying contact paper. Going slow is the best way to avoid mistakes.
- Plan your reconstruction. For this project, the top half of the piece is being used to create a bookshelf. Each side with the glass pieces will be the shelving portion and the top will be the bottom ledge support.
- Fit, cut, glue, clamp, and staple pieces together. The top was flipped and then the middle portion was cut out to create a perfect seam for the two pieces to come together. Use clamps as much as possible when gluing to ensure everything comes out correctly.
- Remove backing for both sides and prepare to paint. Priming surface helps to reduce coats of paint.
- Apply a layer of Vintage using a 2" flat brush.
- While paint is drying, cover the back panels. Slowly remove the sticky side and apply to panels, this might work best with two people.
- After paint has dried, apply Clear Wax.
- Screw the back panels onto the bookshelf.
- Add shelf hardware.
- Because this cabinet is lighted, access to the inside is important. First, build a planked wood square top and set it on top. Trace around the bookcase profile. Cut with jigsaw and sand to make a smooth, professional look.
- Take white based stain and create a 1:1 ratio of stain and water. Let this dry overnight.
- Take a dab of Everlasting chalk paint and brush on thinly and evenly to the planked top. Next, take water and move the paint around until desired look is achieved. The more paint added, the more white washed the surface will be. Brush off any excess paint.
- Put on top once dried and project is completed.


