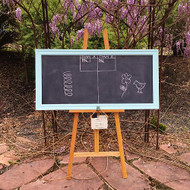
Backyard Game Chalkboard
Posted by DecoArt on Jun 7th 2016
Keep score of outdoor fun with a chalkboard created with Americana® Chalkboard Paint.
SUPPLIES
- stylus or pencil
- tape measure
- staple gun
- chalk
- wood glue
- large flat brush
- wood filler
- trim
- miter saw
- foam roller brush
- drill gun
- ribbon
- wood boards
- container
- wood molding
- doorknob
INSTRUCTIONS
NOTES:
Allow at least two days to complete this project, due to the curing time of the Chalkboard Paint.
- Paint the front of the 2' x 4' wood board with Black Chalkboard Paint. (Use a roller brush for a smoother finish.) Following the package instructions, paint in one direction first, i.e. vertical; allow to dry; and apply the second coat in the opposite direction, i.e. horizontal.
- Cut the molding into (two) 49" pieces and (two) 24" pieces. Cut the edges at a 45-degree angle. (Make sure to measure to the specific board as the boards might vary slightly. The longest part of the boards should be the measurements suggested.)
- Paint the molding using Spa Blue and a large flat brush.
- Use the staple gun to apply the molding to the outer edge of the finished chalkboard. (Wood glue will also help keep the molding on more securely.)
- Use wood filler to fill in the staple holes and to smooth out the molding joints. Let dry. Once dry, sand smooth and apply more Spa Blue to finish the molding.
- Once the Chalkboard Paint has cured, condition it by rubbing chalk lightly over the entire surface and then erase.
- To attach the holder for the chalk and eraser, find the bottom center of the chalkboard. (You can position the holder on the sides as well, if you prefer. )
- Drill a hole in the thickest part of the molding. (This will help keep the doorknob you selected projecting from the chalkboard enough to hang something from it. Be sure not to get too close to the edge of the molding so you don't split the wood. )
- Find an appropriately-sized container to hold the chalk and eraser. If it doesn't already have a hanger, attach a ribbon, string, or rope to it.
- Attach the doorknob through the pre-drilled hole and then use chalk and a ruler to map out the scoreboard and team sections for the game.

