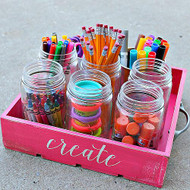
"Create" Stenciled Back-to-School Caddy
Posted by DecoArt on Sep 1st 2015
Supplies for back to school or crafting get organized in this colorful, creative crate.
SUPPLIES
- water container
- palette or plastic plate
- pencil
- 1" flat brush
- wooden crate
- old rag
- hand-sander or sandpaper
- 1" foam brush
- vinyl
- electric drill
- craft hook
- drawer handles
INSTRUCTIONS
NOTES:
Let dry completely between painting steps.
- Sand the entire crate with a hand-sander or sandpaper.
- Paint one end of the crate with two or three coats of Cotton Ball. Allow to dry completely between coats.
- Apply a vinyl stencil of choice for "create" lettering.
- Apply a generous coat of Americana Matte Decou-Page over the top of the vinyl stencil. (After the Decou-Page dries, it will seal the edges and prevent any paint bleeding underneath.)
- Paint the entire crate in Pink Tropics. Allow to dry completely between coats.
- Carefully remove the lettering using a craft hook.
- Sand the edges of the crate, giving a distressed look.
- To add to the distressed look, apply a coat of Walnut Gel Stain. Use an old rag and rub it into the wood.
- Mark the holes for the handles using a pencil. Drill holes using the appropriate size bit. Screw in the handles.
- Using the clean end of a pencil, add dots of Black Tie, Waterfront, Cotton Ball, and Inch Worm to the bottom of the crate slats. (See photo for color placement.)


