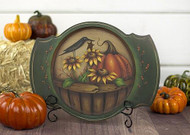
Autumn Basket Plate in Primitive Style
Posted by DecoArt on Oct 6th 2016
Maxine Thomas's popular primitive style of painting resonates in this design featuring a harvest pumpkin and basket.
SUPPLIES
- water container
- palette or plastic plate
- paper towels
- tracing paper
- transfer paper
- 1/2" flat brush
- #6 filbert brush
- stylus
- 150-grit sandpaper
- #10/0 liner brush
- #4 filbert brush
- craft or wood glue
- 1/2" mop brush
- grey graphite paper
- wooden shape
- wooden plate with handles
INSTRUCTIONS
NOTES:
It is easier to complete the detail on the pumpkin before basecoating the sunflowers. This design gets highlights done before shading. When two colors are called for, the first is everywhere and the second is only in deeper/brighter areas.
- Sand and seal the wooden piece. Wipe clean of any dust.
- Basecoat the center of the plate with Khaki Tan. The outside rim of the plate is Hauser Dark Green. Let dry.
- Transfer the main pattern lines, leaving off the berry branches.
- Basecoat the basket with Milk Chocolate; the pumpkin with Burnt Orange; and the pumpkin stem with Dark Chocolate. Basecoat the sunflower leaves and stems with Leaf Green. Basecoat the sunflower petals with Marigold. Basecoat the crow with Lamp Black. Let dry.
- Stipple in the sunflower centers with Burnt Sienna.
- Basket: Basecoat the open spaces between the vertical strips with Lamp Black.
- Highlight with Honey Brown across the center of the band and the center of each vertical strip.
- Shade with Soft Black: on each side of the handle next to the basket; under the top band; at the overlap; and on the vertical strips (each side of center one, left side of left ones, and right side of right ones).
- The wood grain and texture lines on the basket and handle are done using Soft Black.
- The nail is Lamp Black with a highlight dot of Light Buttermilk. (A stylus can be used for small dots throughout this project.)
- Pumpkin: Highlight the center of each segment with Torrid Orange (two times) and then with Primary Yellow. Add a Light Buttermilk sparkle in the brightest side on center segment.
- Highlight the stem center of the pumpkin with Honey Brown. Shade with Soft Black next to the pumpkin and up the left side. The line cracks and tendril end with Soft Black.
- Sunflowers: Highlight the petals with Primary Yellow and then with a 1:1 Primary Yellow/Light Buttermilk mix on the front ones.
- Shade the petals next to the center with Burnt Sienna and then chisel a line down the center with Russet.
- Highlight the centers at the upper right with Honey Brown. Shade with Soft Black along the bottoms next to the petals and in the center divots.
- The texture dots around the divots are Honey Brown. Add some Soft Black ones along the bottoms, letting some fall on the petals. Add Primary Yellow dots to the upper right to highlight.
- Highlight with Irish Moss in the leaf and stem centers. Shade with Hauser Dark Green on both ends of the stems and the bases of the leaves; float in the veins.
- Crow: Highlight (or use a sanding stick) with Khaki Tan at the top of the head and front of the wing. Dash a bit of Khaki Tan to the top of the front leg and tops of the feet.
- The crow's eye is a dot of Primary Yellow with a smaller dot of Lamp Black.
- Berry branches: Line the branches with Soft Black and a dash of Khaki Tan, here and there, for highlights. The berries are added using the end of a small brush with Russet and Burnt Orange. Add a tiny dot to each berry using the stylus with Torrid Orange on the Burnt Orange ones and Khaki Tan on the Russet ones.
- Finishing: The background shading is Dark Chocolate with Soft Black in deeper areas.
- Dry-brush Leaf Green and then Irish Moss along the flat edge of each side next to the design. The berry branches on the sides are done the same as in the design.
- Line the band around the outer edge with Khaki Tan, using the liner brush. (Refer to larger photo.)
- Sand the edges of the plate. Antique around the edges of the plate where desired with Dark Chocolate, wiping back until the desired effect is achieved.
- Glue the star just below the crow's beak.
- Varnish with DuraClear Ultra-Matte Varnish.


