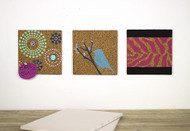
Stenciled Cork Boards
Posted by DecoArt on Sep 3rd 2014
Stencil colorful modern designs onto cork board for unique, yet functional, wall art.
SUPPLIES
- water container
- palette or plastic plate
- paper towels
- #2 round brush
- #10 flat brush
- 1" painter's tape
- glue dots or low-temp glue gun & glue sticks
- cork board
- magnetic buttons
- cosmetic sponges
INSTRUCTIONS
NOTES:
Let dry completely between painting steps.
- FINCH CORK BOARD: Put the Finch Accent Stencil where you would like and use 1" painter's tape to hold it in place.
- Load a cosmetic sponge with Salem Blue. Dab off excess paint onto the plate or palette before applying to the cork board surface. (This will prevent bleeding.) Fill in bird only by dabbing softly.
- Use a clean cosmetic sponge and load with Zinc. Dab off excess paint onto the plate or palette. Fill in the branch only by dabbing softly.
- Use a clean cosmetic sponge and load with Grey Sky. Dab off excess paint onto the plate or palette. Fill in leaves and flower buds by dabbing softly. Remove tape. Remove and wash stencil.
- ZEBRA CORK BOARD: Center the Zebra Accent Stencil onto the cork board and tape it in place.
- Load a cosmetic sponge with Boysenberry Pink. Dab off excess paint onto a plate or palette before applying to surface. Fill in the zebra pattern. Let dry completely.
- Remove the stencil. Use 1" painter's tape to mark off borders on each side.
- Use a #10 flat brush and Lamp Black to paint the borders. Remove tape. Remove and wash stencil.
- KALEIDOSCOPE CORK BOARD: Place the Kaleidoscope Accent Stencil where you want it on cork board surface and tape it down with 1" painter's tape.
- Load a cosmetic sponge with Sweet Mint. Dab off excess paint onto the plate or palette. Fill in the big shape and center of the medium shape.
- Load a clean cosmetic sponge with Lilac. Dab off excess paint onto the plate or palette and fill in the medium shape.
- Load a clean cosmetic sponge with Victorian Blue. Dab off excess paint; fill in remaining shape and the center of the large shape. Remove stencil and tape.
- (Optional) You can continue to fill in the cork board by turning the stencil and adding more shapes, painting with the same colors. Remove and wash stencil.
- Using a #2 round brush, load it separately with Lilac and Victorian Blue to outline the shape centers. Rinse brush between colors and at the end.
- (OPTIONAL) To hang the cork boards on a wall, either use glue dots or glue gun and glue sticks to apply magnetic buttons.

