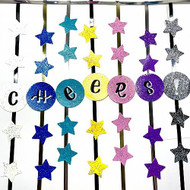
Glittery New Year's Eve Banner
By: DecoArt
December 22, 2020

Who is ready for the new year? New Year’s Eve may look a little different this year, but that doesn’t mean we can’t still celebrate and decorate! Follow along as we show you how to create the cutest New Year’s Eve banner to send off 2020 in style.
I’m using DecoArt's new Holographic Illusions™ glitter paint to make sure these decorations really stand out. These are not your ordinary glitter paints at all. They have holographic light-refracting glitter flakes that add a prismatic flare to anything! You can find Holographic Illusions™ for sale online and in stores at Hobby Lobby or at select Joann Fabric Stores.

Items needed:
- Americana Acrylics 16oz - Bright Yellow
- Americana Acrylics 2oz - Poodleskirt Pink
- Americana Acrylics 2oz - Purple Pizzazz
- Americana Acrylics 2oz - True Blue
- Americana Acrylics 2oz - Graphite
- DecoArt Holographic Illusions 2oz - Magic Gold
- DecoArt Holographic Illusions 2oz - Fairy Pink
- DecoArt Holographic Illusions 2oz - Divine Purple
- DecoArt Holographic Illusions 2oz - Enchanted Blue
- DecoArt Holographic Illusions 2oz - Silver Illusion
- DecoArt Holographic Illusions 2oz - Mystic Black
- Paint brush
- Paint palette or plate
- Scissors
- Ribbon
- Black and white paint pens
- Glue
- Hole Punches (I used 2” round and 1.5” star)
- Thick card stock or watercolor paper
Instructions:
Gather up your favorite Americana® Acrylics colors (ones used in this photo are listed above) and Holographic Illusions™ and get them prepped on your palette. Holographic Illusions™ works best when paired with a similarly colored base coat, or use it over black for a more dramatic impact. I’m always up for a good rainbow so I chose rainbow shades to get the full spectrum.


Tip: Holographic Illusions™ may look white when right out of the bottle but when dry it turns clear, as you can see with these samples below.

Once you have your colors picked out, we get to painting! I used thick watercolor paper here and did one base layer of the Americana® Acrylics colors I chose. After the base layer is dry, you can go in with a generous layer of Holographic Illusions™. I like to use a large flat brush and the texture of the watercolor paper helps to really soak up that glitter and make sure there is a good amount in all areas.

After you have each color you want in both a base layer of Americana® Acrylics and a second layer of Holographic Illusions™ (and they are completely dry), we’ll take the hole punches and get started. Depending on the length of your ribbons and the spacing you like, cut out the shapes you need to fill the banner.


I used both circle and star cut outs to add some fun variety. Doesn't that glitter look fantastic?

You can really see the glitter shine over the black background!

Now add a "cheers" to the middle of the banner by using the round cutouts. I took my black and white paint pens to create the letters. Only one layer of paint pen was needed for each letter.

You will take the ribbon and cut to desired lengths. You can stagger them so they’re a little different at the bottom or just cut them all the same length. You’ll need one long strand to span the length of where you’ll be hanging the banner.

Then take the glue of your choosing and start placing each cutout along the length of the ribbons.

Let the glue dry and then string all the ribbon strands together into one large banner. You’ll be able to stun any party (or zoom party) with the holographic rainbow glitter that this paint brings to the table! Hang it up and watch it shine!

Thanks for following along, and we hope you have a safe and festive New Year! If you're looking for more New Year's ideas be sure to check out the DecoArt® Project Gallery.
Comments
Leave a comment: