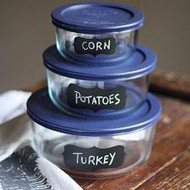
Christmas Hostess Gift
Posted by DecoArt on Dec 6th 2013
This holiday season if you’re looking for a unique and highly useful gift for your dinner hostess, turn ordinary Pyrex storage containers into the gift that gives all year long! Using glass chalkboard paint, you can give turn ordinary storage containers into easy to find leftover treats. This makes an ideal gift for anyone who loves to cook, and they’ll reap the benefits all year long.
Items Needed:
- Clear Contact Paper
- Scissors
- Pen
- Cosmetic Sponges
- Paper Plate
Instructions:

The beauty of this gift is they are useful, and not just for the holidays. While they are certainly ideal for storing that leftover turkey, ham, stuffing and Christmas cookies, they are great for any food, any time. Every time your gift recipient uses these, they’ll be thinking of you!
To make these you can use any label pattern you like. I used the one I found on Creativity Exchange.
Print off your preferred label and be sure the size will fit your Pyrex dish with the lid on.
Place the print out underneath the contact paper and trace the label with a pen.
Hint: I use a foam core board and push pins to hold everything in place while I trace.
Once you’ve traced all your labels cut the inside of the label out. Be sure that you leave about ¾-inch border around the label shape so that you have room when stenciling.
Hint: To be sure both sides are symmetrical, fold the contact paper in half and cut both sides at once as shown.
Peel the adhesive backing off of the stencil and carefully position it on the glass dish. Work slowly and make sure that all air bubbles are out before you start applying paint.
Squeeze some chalkboard paint onto a paper plate. Load the cosmetic sponge with paint then dab off the excess. Stencil one layer of chalkboard paint over the stencils on each dish. Start over again for a second coat.
Don’t wait, go ahead and peel the stencils off of the glass. If there are any blemishes fix them with a fine point paintbrush.
Now for the hard part; drying time. You will need to let these sit for 4 days. After the 4 days is up, put the glass containers (remove the lids) in a cold oven. Close the door and turn the temperature to 325 F. Bake for 30 minutes. When finished, crack the door open and leave the containers in the oven until the oven has cooled completely.
Remove the dishes from the oven and condition the chalkboard by rubbing a piece of chalk all over the surface of the label. Erase the chalk with a soft cloth. Your dishes are now ready for use!
These dishes can be washed in the dishwasher, top rack is recommended.
Hope you enjoyed the project and it inspires you to try to recreate something with your own style!


