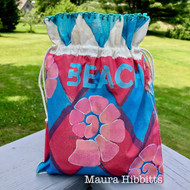
Mixed Media Beach Bag
Posted by DecoArt on Jul 10th 2019
If you are like me, there are always a lot of little things to pack to take to the beach…my book, reading glasses, sunglasses, lip balm, sunscreen, phone…and the list goes on. I like having bags and pouches to sort my things out and make them easier to find in the big beach bag. I also love finding new ways to use items that could easily be thrown away, like packaging. I recently bought some wool dryer balls from Trader Joe’s which came in a cool canvas bag, perfect for upcycling.
The DecoArt Mixed Media Design Team received Gelli Arts® gelli plates, a brayer and Americana Premium Acrylic paints from the generous folks at Gelli Arts®s and DecoArt to use with our summer projects. Once I start playing with paint and a gel plate, I am lost in time, and hours later I emerge again covered in paint. So much fun, and I highly recommend it if you haven’t tried this yet!
Thus, upcycled canvas bag meets Gelli® plate and paint!
**DecoArt Note: Find more Gelli Arts® + Americana Premium projects here and learn about our giveaway!
Items Needed:
- Americana Decor Stencils - Ocean Life (ADS205-K)
- Gelli Arts® 5x7 Gel Plate
- Gelli Arts® Diamond Gel Plate
- Gelli Arts® Brayer
- Serendipity Stencil
- Small Canvas Bag
- Palette Knife Or Spatula
- Cosmetic Sponge
- Cardboard
- Scissors
- Newsprint (or Non-glossy Junk Mail)
- Embroidery Floss
- Needle
- Heat Tool
- Baby Wipes
Instructions:
Step 1: Take a canvas bag and insert a piece of cardboard into the center of it. The bag can be upcycled, like mine, hand sewn, or purchased.


Step 2: Blend Cobalt Teal Hue and Cerulean Blue on the 5x7 gel plate. I found it easier to mix on the larger plate, pick it up with the brayer, and transfer to the diamond plate. Starting at the base of the bag, “stamp” a row of half diamonds with the gel plate. Above these, “stamp” another row of diamonds with the gel plate, then at the top, lighten the blues up a bit with more Cobalt Teal Hue and Translucent White, and “stamp” half diamonds across the top. When you finish, your bag will have a harlequin style pattern in blue. I went back in and added a second layer of blue paint to my diamonds. Let dry or use a heat tool and repeat on the second side. TIP: Clean off the brayer by rolling it onto newsprint to get most of it off, then take off the rest with a baby wipe. I also do the same thing with my plates.


Step 3: I wanted to create a coral color, and blended Quinacridone Magenta, Cadmium Orange Hue and Translucent White until I had what I needed. I found it easier to blend with a palette knife on the larger gel plate. I repeated Step 2 with the coral, going in-between the blue diamonds. At the top, I laid paper across the cord area as a mask, to try to get a more even top.


Step 4: Next, I stenciled on the shell pattern, using the Ocean Life stencil, a cosmetic sponge, and Titan Buff. Then, I mixed up a bit of Translucent White and Quinacridone Magenta and dabbed a bit of that around the edges for some variation. I repeated the design at the top and bottom corners.


Step 5: I decided I wanted my shell in bolder colors, so re-stenciled it using a mix of Cadmium Orange, Quinacridone Magenta, Titan Buff and Translucent White. I like that this leaves a bright outline around my stenciled area.

Step 6: Time to add the Word Beach with the Serendipity stencil, and a blend of Cobalt Teal Hue and Translucent White with the cosmetic sponge. Once again, I found it handy to use the large gel plate to mix my colors on. TIP: When stenciling with a sponge, be sure to tap off most of the paint before stenciling as this will give you a cleaner image.


Step 7: Repeat Steps 4 and 5 on the other side of the bag with the Ocean Life stencil.


Step 8: I like to add a bit of embroidery into my work now and then. I used teal embroidery floss to add a blanket stitch design around the top of the bag.

Details: Thank you Gelli Arts® and DecoArt for the opportunity to play with your great products and create my beach bag!

Now I have a cute little bag to take to the beach that I can put my Kindle and reading glasses into.


I encourage you to look at the packaging of items you buy and think “outside the box” for a way to repurpose it, and I hope you will try making yourself a cute beach bag! Maura


