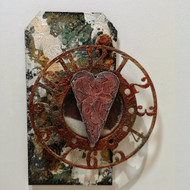
Time Worn Heart Tag
Posted by DecoArt on Feb 12th 2019
This project includes a layered background and true rusty technique to give an overall sense of timeworn grunge.
I often include hearts in my projects, usually building the project around the different feeling’s hearts can evoke. As with a lot of my work it tends to be feminine, but with a grungy twist. I love texture, so it is important to me to find items that really highlight the layers I like to use.
Watch the tutorial for this project:
Find DecoArt Media products in the DecoArt online store.
Items Needed:
- Americana Decou-Page Papers - Olde Worlde (DP10-K)
- DecoArt Media Mediums and Specialty Products - Modeling Paste - White (DMM21-71)
- DecoArt Media Mediums and Specialty Products - Texture Sand Paste (DMM23-71)
- DecoArt Media Mediums and Specialty Products - Gesso - White (DMM18-71)
- DecoArt Media Mediums and Specialty Products - Crackle Paste - White (DMM17-71)
- Selection Of Flat Brushes
- Palette Knife
- Water Spritzer
- Sponge
- Wax Resist Stick
- Heat Tool
- Tando Creative Limited Tag, Clock Dial, Heart, And Bolts
- Acrylic Disc
- Small Beads
Instructions:
Step One: Whenever creating a project, I find it easiest to plan my layout first before painting or gluing anything. Once you are happy with your design layout take a photo for reference. Next paint your tag in a base layer of Paynes Grey. Around the edges, add a layer of wax – this will form a resist.

Step Two: Paint over the tag in a layer of Metallic Gold. Once dry, use your heat tool to melt the wax and use a baby wipe to rub away the paint in these areas, revealing the layers underneath. Rip sections of decoupage papers and glue these to the tag.

Step Three: Add washes of Paynes Grey and Phthalo Green-Blue across the tag, building the intensity of colour. You can even add splatters of paint for a more textured effect. Once you are happy with the look, use a sponge to add a border of Paynes Grey to the tag.

Step Four: Once your paint layers are dry, take a palette knife and Crackle Paste, and spread this over the tag – making sure there are no harsh lines. Set this to one side to dry.

Step Five: Once the paste is dry and the crackles have formed, add a wash of Quinacridone Gold to knock back the stark white of the paste.

Step Six: To finish the tag background, add splatters of white. Adjust the size of the splatters by using smaller or larger brushes.

Step Seven: To create the rusty effect on the clock dial, being with a rough layer of Texture Sand Paste to the dial surface.

Step Eight: Once dry, paint the dial in a layer of Metallic Silver.

Step Nine: Add washes of Paynes Grey, Burnt Umber, Yellow Oxide and Quinacridone Gold to the dial to begin the rusty effect.

Step Ten: Add neat Quinacridone Gold across the dial, building up areas. Use your heat tool to bubble the paint adding more texture.

Step Eleven: Repeat this same rusty technique on two bolts, a disc and ring.

Step Twelve: Glue an acrylic disc to the reverse of the clock dial, followed by the ring. Once the glue is set – pour in your glass beads before sealing them in place using the disc.

Step Thirteen: For the textured heart, using a palette knife - roughly apply a layer of Modeling Paste to your greyboard heart.

Step Fourteen: Once the Modeling Paste is dry, paint the heart in a coat of Cadmium Red Hue, being sure to get into all the spaces created by the paste.

Step Fifteen: Add a wash of Paynes Grey to the heart, the wash will pool where you have created texture.

Step Sixteen: Use a soft dry brush and dry brush the heart in white to highlight all the texture created by the paste.

Step Seventeen: To finish, glue the dial off set to the tag base, add the bolts just under the dials edge and finish with the textured heart to the dials centre.


