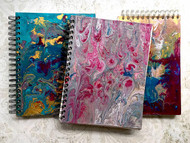
Recycled Marbled Journals
Posted by DecoArt on Dec 13th 2018
Hello everyone, Catherine here! I hope you’ve had a great fall and are ready for winter! Today I want to share a fun technique that you can use to make some custom Journal Covers to give as gifts for the artists in your life.
Lately, I’ve been fascinated with the paint pouring videos and paper marbling -- the pouring techniques are a fun, new fad -- but paper marbling has been around forever. I challenged myself to combine the 2 techniques to see what I could come up with, and I’m super excited with the results.
I also had some items I wanted to recycle and repurpose -- old journal heavy-weight pre-punched journal covers -- and a pad of paper that I love - but was just too big to carry around in my bag and out of my comfort zone to use -- so I decided to create new journals with marbled covers. My reasoning for using the paint pouring technique -- I wanted to recycle the pre-punched journal covers I had taken apart and I knew that simple marbling would not cover the designs that had been printed on the covers. While I’m a big fan of the big cells you sometimes can get with paint pouring -- I also have a hard time with the idea of “pouring” paint and having so much waste. Once a hoarder always a hoarder, so this recycling project worked out perfectly.
Items Needed:
- DecoArt Pouring Medium 8oz - Pouring Medium (DS135-64)
- Recycled Journal Covers
- Paint Tray To Catch Paint
- Gloves And Table Covering
- Cups Or Jars
- Popsicle Sticks
- Binding Machine
Instructions:
I started by covering my work surface with an old plastic shower curtain to protect everything from splatters and positioning my journal cover inside a paint mixing tray, it’s important to note that the journal cover is elevated to allow any excess paint to run off. I also had paper towels and surgical gloves on the side to keep my hands somewhat clean.
Before any marbling could happen, I needed to mix my DecoArt Pouring Medium with my Media Fluid Acrylics and stir them well. I used a small shot glass to measure out the same amount of the Pouring Medium for each color and then dropped 1 - 2 teaspoons of Media Fluid Acrylic into the medium and stirred with a popsicle stick.


I also tried to use colors that would not create mud when they mix on their own-- and also a touch of gold to create something rich and beautiful.

Next, I covered the entire journal with the white paint that was mixed with the pouring medium and moved it around to cover all the printing, then I poured the colors on the top creating a random layered look. Once I was happy with that I picked up the cover and tilted it back and forth and all around to move the color to create an interesting marbled look. Then I splattered some additional colors over the top and let the paint drip off into the tray some.

Once the paint had dripped off some, and through all the punched holes -- I set the cover aside, elevated so it would not stick to anything and worked on a few more.

My favorite result happened when I started cleaning up. I had SO MUCH paint caught in my drip tray that I could not throw away -- so I poured it on another cover and just fell in love with the results -- and was super excited with the fact that I ended up NOT throwing any paint away. While the covers felt dry after a day, I did wait several days before assembling the journals using my coil binding machine to make sure they were good and dry.

I hope that you will give this technique a try, the results are super fun and you can sport a custom journal that everyone will wonder where it came from.
Thanks for dropping by today, have a great Christmas season.


