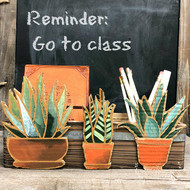
Dorm Room Desktop Faux Planter Storage Box
Posted by DecoArt on Aug 16th 2018
Storage in dorm rooms can be tight, so everything needs to be double duty! Even though desktop storage can be precious, a faux planter storage box is a great way to keep things organized, and still be trendy. Everyone needs a little green in their life, and cardboard faux Aloe is the perfect plant for a busy college student!
Using cardboard from a recycled box, a pre-made open wood box, Americana Multi-Surface Satin Acrylics paint, and Americana Reusable Adhesive Stencils, you can make an inexpensive, and super-cute “planter” for desktop storage that adds a fun touch!
Items Needed:
- Americana Stencils 10x10 - Aloe Vera (ASMM115-Y)
- Pre-made Wood Box (12x4 Inches)
- Small Craft Paintbrushes
- Cardboard (from Recycled Boxes)
Instructions:

Step 1: Cut the stencil around edges. Place the stencil on cardboard and press to adhere. Paint pot on the stencil with Paprika Multi-Surface Paint, and brush Cotton Ball at the top edges. Lightly add Bittersweet to the bottom to create shading. It works better if the paint is still slightly wet, so the colors can blend better.

For the top of the plant, use a smaller brush to add varying shades of Woodland Green, Melonball, Green Beret, Lemon Zest, and Cotton Ball to create a variation in foliage in the different leaf cut-outs.

To mimic a Sansevieria, paint the stalks on the thinner Aloe stencil all the same shade of green, such as Green Beret, and use Lemon Zest to add stripes.

The nice thing about Americana Multi-surface is that it’s very mixable and it’s easy to blend the paint. I also love how you can use this Multi-Surface paint in lots of different ways, like when I made this southwest-inspired vase with a cactus scene.
Step 2: Once all of the plants are painted, and the paint is dry, carefully use a craft knife or small scissors to cut around the edges of your stenciled plants.

Tip: Manicure scissors work really well for the smaller areas with thinner cardboard or cardstock.

These are so cute, you could also use them as embellishments on picture frames!
Step 3: Add tacky glue to the back of the cut-outs, and adhere to the pre-made box. Let lie flat until the glue is dry.

Small jars inside of the box tame loose items such as pencils. It’s also great for art supplies, any little bits and pieces, or even real plants as a planter!

Find more creative inspiration at my site below, or visit my retail store The Collective lhe + Makery in Lisle, IL

