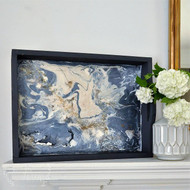
Geode-Inspired Decorative Tray
Posted by DecoArt on May 24th 2018
I’ve been a total “rock geek” since my childhood. I always loved picking up the sparkliest rocks on the beach, and if I can find one with a few crystals in them, that was a bonus.
I’ve always loved the look of geodes and agates, and thought a geode-inspired tray using pouring medium, glitter, and various DecoArt paint, as well as a plain tray from Walnut Hollow, would be the perfect marriage to make a beautiful, and decorative tray.
Items Needed:
- Americana Multi-Surface Satin Acrylics 8oz - Cotton Ball (DA500-9)
- DecoArt Extreme Sheen 2oz - Pearl (DPM01-30)
- DecoArt Extreme Sheen 2oz - Pewter (DPM12-30)
- DecoArt Clear Pouring Topcoat 16oz - Clear Pouring Topcoat (DS134-65)
- DecoArt Pouring Medium 16oz - Pouring Medium (DS135-65)
- Wood Tray (Walnut Hollow)
- Natural Mica Glitter
- Small White Glitter
- Small Gold Glitter
- Gold Glass Glitter
Instructions:

First, paint the sides of your tray. I used Chalky Finish in Relic for the sides and back of my tray. Once that dried, I mixed my pouring medium and paint at a 50/50 mixture. I was using Cotton Ball the most, so I mixed a larger size of that at about a 1/3 cup paint to a 1/3 cup pouring medium.

After all of your paints are mixed, pour the Cotton Ball mixture in the center. Immediately begin to pour in the other colors, but instead of pouring straight down on top of each other, pour in a circular pattern.

Move your circles inward as you go. Repeating colors if necessary.

Once all of your colors have been poured, gently pick up the tray, and start tipping side to side to move the paint. Try to retain the circle pattern as much as possible. It won’t stay perfectly circular, but that is some of the beauty of it, and how it makes such natural, organic shapes.

Once you have the pattern you like, place the tray flat, where it won’t be moved, and start sprinkling glitter along some of the natural “fissures” in the stone. I first used the mica glitter, then I sprinkled the white glitter along that, to represent smaller “crystals.”

Continue the same with the small gold glitter, and then at the end, add the gold glass glitter. This will give it a “pyrite-effect.” If you aren’t familiar with glass glitter it’s real glass and has a pretty sparkle. It’s more dimensional than regular old glitter.

Let the try dry completely flat for 24 hours or more.
After the tray dries, pour the TopCoat on.

Pour the TopCoat directly in the center. I used about a full cup for this size tray. Tip the tray to move the TopCoat around. This will be a case where you won’t let the excess run off on an angle. All of the top coat will stay on the tray.

If your TopCoat doesn’t quite make it into the edges, use a palette knife to spread the TopCoat into the corners.
Once the entire tray is covered, let dry completely flat for 24 hours or more, in a well-ventilated, low-humidity, on a protected surface. It will be very hazy from the wet TopCoat, but this will clear up while it dries.

After drying, your tray is ready for display!!! The glitter adds such a fun dimension, and in person, is even prettier, and glitterier.

You’ll love how this Pouring Medium will transform the decor in your home.

