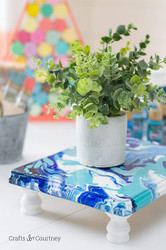
Paint Poured Tray
Posted by DecoArt on May 17th 2018
I have fallen in LOVE with this Pour Painting trend right now! I've done a couple projects on canvas but I wanted to try something new. A more home decor piece. Last month I made a farmhouse style tray and I just loved how it turned out. SO I thought let's try making one for my craft room and give it a little artsy feel!
Items Needed:
- DecoArt Clear Pouring Topcoat 16oz - Clear Pouring Topcoat (DS134-65)
- DecoArt Pouring Medium 16oz - Pouring Medium (DS135-65)
- Tin Foil
- Disposable Cups
- Stirrers
- Wood Plaque
- Wooden Knobs
- Gorilla Glue
Instructions:
Let's start off by picking out the perfect size plaque for our tray.

Next, let's pick out our colors! Blue is my favorite color, so I went with a blue theme for this project.

Mix paints with Pouring Medium with a 1:1 ratio.


Mix well.

Make sure to prep your area, this can get messy!

I poured each color onto my wooden plaque overlapping my colors. Tilt your plaque back and forth until your paint starts pouring over the edge. Let dry 24 hours.

Now that your paint has dried, it's time to add your Clear Pouring Topcoat. You can paint on with a paint brush OR use it as a pouring medium. Let dry overnight.
*Using a paint brush may leave brush strokes.

Finally, it's time to add our knobs, I used some super handy dandy Gorilla Glue.

Alright we're finished!! Let's get decorating.
*The Clear Pouring TopCoat is not heat resistant and is for decorative purposes only.

This is seriously such a fun project to do, you will become obsessed with it. What I love is you'll never get the same look twice. Thank you so much for stopping by, I hope you give it a try!


