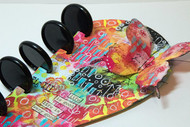
Bright Butterfly Journal
Posted by DecoArt on May 9th 2018
It never fails to amaze me how a few layers of paint and some simple mark making can totally transform a plain background into something so vibrant and colourful. The medium bodied Americana Premium Acrylics have the most amazing pigment load which makes building up bright colours in a project like this a dream! Because of their translucency they layer beautifully and sometimes create additional colours which you weren’t necessarily expecting, and sometimes even a bit of a glow.
Items Needed:
- DecoArt Media Mediums and Specialty Products - Gesso - White (DMM18-71)
- DecoArt Media Mediums and Specialty Products - Gesso - Black (DMM19-71)
- DecoArt Media Mediums and Specialty Products - Clear Matte Medium (DMM20-71)
- Disc-bound Watercolour Journal (Joggles)
- Art Parts Butterfly (Joggles)
- Paintbrushes
- Stencils
- Textures And Fossils Stamp Set (Andy Skinner For Stampendous)
- Inkpads
- White Gel Pen
- Junk For Stamping
Instructions:
Coat the front and back of all pages, as well as the butterfly, with a layer of white gesso. When this is dry add some light patches of black gesso to each page; I find that three areas of black usually works well.

Using a flat paintbrush start to add patches of Primary Magenta. Begin by painting a small area of white and then add colour to it allowing it to blend. Let this dry and then start to add patches of Cobalt Teal Hue, overlapping the pink areas a little but allowing some of the black to remain.

Continue in this way adding areas of Green Yellow Light. Once these colours are dry add some of the Primary Yellow. Adding yellow can sometimes have magic qualities! It is a really translucent colour and layers really well over the magenta to create a lovely orange glow. If things are looking a bit too bright add some brushstrokes of white to tone it down and break it up a little.

Sponge through both of the stencils in random areas. Try tone-on-tone, but also try adding contrasting colours as that can really pop!

Finger painting is one of my favourite ways to add marks to a page. Adding a very small amount of water to the paint makes it easier to add marks, and then add finger dots in small groups. I added some in white but also in the magenta and the yellow.

Printing with the edge of a flat paintbrush is another great way to add marks, especially when you add them as a group. I especially like the way the teal contrasts with the magenta.

Add some stamping with the Andy Skinner stamp sets. I find that stamping tone-on-tone is a useful and easy way to build up the background, but stamping in black makes more of a feature.

Complete the butterfly in the same way, although I chose to omit the black on the butterfly for some contrast. If you want to add stitching (which is always optional) the simplest way is to stitch the butterfly first and then add it to the page with the matte medium.

Now for the finishing touches. Add some doodling with the white gel pen. It’s a great way to tidy things up and also adds some much needed white highlights amongst all the colour! Junk stamping in both Carbon Black and Metallic Gold is a lovely top layer. I also used a stamp from the Andy Skinner set with the gold, and as long as the paint is wiped off straight away it is perfectly fine to do this to your stamps. Add a quote if you wish and then bind it all together using the discs. You can easily add more pages, and also remove pages to work on them further.


