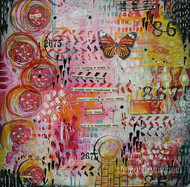
Art Journaling the DecoArt Media Way
Posted by DecoArt on Jul 17th 2017
Kate here! Without doubt my biggest mixed media passion is art journaling, and it’s something that I have been doing now for about 9 years, so much so that it is hard to imagine life without it. Art journaling brings an anything-goes, rules-free approach to art making which is both liberating and yet a little intimidating at the same time. As adults we impose so many rules on ourselves and our inner critic can often be heard roaring which can be off-putting and can stifle our creativity. I know when I am well and truly art journaling when I become completely lost in the process and just enjoy playing with colour and pattern for no purpose other than to create and enjoy and the bright and vibrant pigments of the DecoArt Fluid acrylics really satisfy my need for colour on my art journal pages.
As Picasso once famously said: ‘It took me four years to paint like Raphael, but a lifetime to paint like a child.’
Items Needed:
- DecoArt Media Misters - Carbon Black (DMM08-30)
- DecoArt Media Mediums and Specialty Products - Modeling Paste - White (DMM21-71)
- DecoArt Media Mediums and Specialty Products - Gesso - White (DMM18-71)
- DecoArt Media Mediums and Specialty Products - Clear Matte Medium (DMM20-71)
- DecoArt Media Mediums and Specialty Products - White Tinting Base (DMM29-71)
- Art Journal Or Sketchbook
- Archival Inkpads
- Favorite Stencils
- White Pen
- Pencil
- Crayons Or Oil Pastels
- Junk For Stamping
- Assorted Brushes
- Bits Of Ephemera
- Selection Of Stamps
- Vintage Text
Instructions:
Begin by adding gesso to a page in your art journal, and then quickly scribble into it with a regular pencil while still wet to add hidden texture.

Use your fingers to ‘scribble paint’ randomly, adding a touch of Quinacridone Magenta to blend with the Tinting Base to create a more pastel shade. Tap your fingertips to create pattern.

Add Primary Yellow in the same way. These colours will blend harmoniously so there is no fear of making mud by adding these two colours! I like to loosely add some journaling in pencil at this point, which I would describe more as a stream of consciousness, rather than planned quotes or writing.

Use Archival inkpads to stamp any favourite background stamps randomly, repeatedly stamping and occasionally overlapping them. At this point if you feel you need to subdue any areas just add a bit of Tinting Base, and scribble into it with a pencil.


Modeling Paste works really well through a stencil and adds lovely dimensional texture to a journal page. I used Andy Skinner’s Bubbles stencil and a palette knife to add a bit of paste in random areas.

At this point I like to add some scribble with any kind of crayon or oil pastel. Most of this will get covered up by other layers, but it is all about the process and allowing yourself to play. I also added some collage elements using the Matte Medium, and sponged some Vermilion paint through a stencil.

Increase the intensity of colour by adding Quinacridone Red and Hansa Yellow Medium using a paintbrush. I prefer to work with small amounts of paint in thin layers, allowing the colour to build gradually. The Cobalt Turquoise Hue is a lovely contrast to the reds and pinks of previous layers, and works well as a top layer sponged through a stencil. And of course at any time you can add more stamping, overlapping the layers.

Most of the time if a page is looking ugly or you just don’t like it, it probably just hasn’t got enough layers on so keep going with the layers! Add junk stamping using old bottle lids and the edges of old credit cards, and also try printing with the edge of a paintbrush to make marks, and also polka dots. I like to use some black for this as it is a wonderful contrast to all the brights so far. The Media Fluid Acrylics are excellent for ‘splatting’ and creating a run of dots across the page because they are so fluid and also highly pigmented.

To complete the page I added some doodling with a white pen and some more junk stamping with the Metallic Gold. The gold makes a fabulous top layer! The words are ‘found’ poetry, which are random phrases I cut from a vintage text book, and then a small butterfly completes the page.


