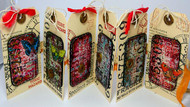
Butterfly Tag Book
Posted by DecoArt on May 22nd 2017
Kate here! I love colour, and I also love mini books and tags, so I combined all three of my favourite things to make this artsy little tag book, bound together with a couple of strips of vintage silk ribbon. I used a selection of the DecoArt Media Fluid Acrylics applied with a brayer, but you could experiment with different colours. You occasionally get surprising and unexpected results when you layer colours over each other with a brayer, sometimes even making new colours along the way!
Items Needed:
- DecoArt Media Mediums and Specialty Products - Texture Sand Paste (DMM23-71)
- DecoArt Media Mediums and Specialty Products - Gesso - White (DMM18-71)
- DecoArt Media Mediums and Specialty Products - Clear Matte Medium (DMM20-71)
- 12 Luggage Tags
- Lengths Of Ribbon Or Scraps Of Fabric
- Archival Inkpads
- Tando Creative %E2%80%93 6 Mini Media Boards%2C Industrial Elements
- Tando %E2%80%93 Mini Stitches Stencil
- White Pen
- Pencil
- Assorted Junk For Stamping
- Assorted Stamps
- Tiny Collage Images
- Assorted Brushes
Instructions:
Begin by prepping the luggage tags. Stamp randomly around the edge of each tag using a variety of stamps and the inkpads. The centre of each tag will be covered by a media board so focus mainly on the edges.

Apply a layer of gesso to each mini media board, and scribble into it while wet with a regular pencil. Mostly this won’t be seen as it will be covered by further layers, but it does add a touch of texture.

Using the brayer add a layer of Titan Buff all over the tag. I often use white for this first layer but Titan Buff gives a slightly more vintage look. Add colour to the edges working from the outside in, and starting with the lightest colour and working darker always ending with Carbon Black. Use small amounts of paint and work the brayer well on a craft mat before adding to the board. Here I used Quinacridone Red followed by Quinacridone Magenta, and finally Carbon Black. Make sure that the edges of the board are covered; I used the black for this.

Add some stamping to the board using the inkpads. I stamped a texture stamp around the edge, then a text stamp in the centre, and finally large bold numbers along one edge.

Using colours that you have already used on the tag, sponge through the Mini Stitches stencil and then doodle around this with a white pen. Add extra touches of colour by stamping with junk such as an old credit card or bottle lid, and at this point I like to add a contrasting colour for a pop of colour; I used Cobalt Teal Hue for this.

Repeat these steps on the remaining Mini Media Boards, always beginning with a layer of Titan Buff and then experimenting with different colour combinations, before finishing with a light touch of Carbon Black. Here I started with a layer of Cobalt Teal Hue.

As a second layer I added Quinacridone Magenta, which combined with the Teal to create a purple hue around the edge!

At this point I like to line up all of the Media Boards and to ensure they look ‘balanced’. As a top layer I like to add some junk stamping with Metallic Gold. Although all of the boards are a different colour having some consistencies such as this helps to give the project some cohesion. You might also like to add some collage images at this point using the Matte Medium. I added butterflies but not on all boards as I don’t like too much symmetry! When happy with the arrangement add the Media Boards to the stamped luggage tags using Matte Medium.

Take some of the washers from the Industrial Elements kit and add a layer of Texture Sand Paste by patting with your fingers for plenty of texture. Allow to dry and then paint with a layer of Metallic Gold. To age it a little, make a wash by adding water to some Burnt Umber and paint a wash over the top of the gold. Blot with a piece of kitchen towel until you are happy with the look.


Remove the string from the luggage tags and add a washer over each of the holes. Add a more washers in random places on some of the tags.

Use lengths of ribbon or cut scraps of fabric to bind the book with. I sandwiched the ribbon between the finished tag and another plain tag, leaving a long length at one end to wrap around as a fastener. I added the strings along with scraps of ribbon through the washers to complete the look.


