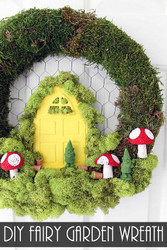
DIY Fairy Garden Wreath
Posted by DecoArt on May 4th 2017
Loving the fairy garden trend but worried you don’t have anywhere to put one around your home? I have a solution! Try making this DIY fairy garden wreath for your front door. It adds that little touch of whimsy that we all need in our lives sometimes!
Items Needed:
- Patio Paint 2oz - Sunshine Yellow
- Wreath Form
- Chicken Wire
- Unfinished Fairy Garden Door
- Moss
- Foam Ball
- Wine Corks
- Paint Brush
- Fairy Garden Miniatures
- Round Foam Brushes
- Serrated Knife
- Craft Knife
- Wire Cutters
- Hot Glue And Glue Gun
Instructions:
Gather your supplies.

Start by painting your wreath form in green. Patio paint is perfect for outdoor applications so if your wreath is going to be outdoors I recommend picking up the colors listed above. Adding the green to the wreath form will ensure that no white shows through your moss.

Add a few coats of yellow or any other cheery color to your unfinished fairy door. Be sure to allow your paint to dry completely in between coats. I recommend painting all of the surfaces of the door (even the back) to protect it from the elements.

Now we are going to make some mushrooms. Cut the foam ball into four pieces (in half once then both of those halves into half). A serrated knife works best for this. Cut the wine corks into two pieces (in half lengthwise) with a craft knife. Paint the foam pieces in red and the cork pieces in white.

Allow to dry completely then add on white dots to the foam pieces with a foam pouncer brush. Allow to dry.

Once everything is dry, you can begin to assemble your wreath. Cut chicken wire with wire cutters to fit just inside the wreath with a little overhang. Add it to the back of the wreath by pushing the ends into the foam to hold it into place. You can also use a little hot glue to secure. Remember that the cut edges of the chicken wire will be sharp so wear gloves and use caution.

Cover the entire surface of your wreath with sheet moss. Use hot glue to secure into place. All surfaces should be covered when you are finished.

Start adding on your elements along with another type of moss to really make the entire thing stand out. This is where you can get creative with your mushrooms, door, and some purchased miniatures. I used some mini clay pots and mossy gnomes but you can pick anything you like to add to your fairy garden wreath.

Keep layering on moss and fairy garden miniatures until you are happy with your wreath. Secure everything with hot glue.

I love how this DIY fairy garden wreath turned out. This may be my new favorite wreath! I will be leaving this one up as long as possible. Do y’all think it is okay for fall? Maybe?


