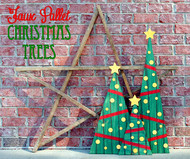
Faux Pallet Christmas Trees
Posted by DecoArt on Nov 14th 2016
Items Needed:
- Americana Decor Color Stain 8oz - Brick (ADCS07-36)
- Americana Decor Color Stain 8oz - Chocolate (ADCS19-36)
- Americana Decor Color Stain 8oz - Forest (ADCS12-36)
- Epoxy
- Wood Board 16" By 36"
- Wood Board 12" By 36"
- Painters Tape
- Assorted Brushes
- Wood Circle And Stars
- Table Saw
- Cotton Swab
Instructions:
I purchased 2 wood boards at the hardware store, one 12"x36" and one 16"x36". I drew triangles on them, and my husband was kind enough to cut them out for me on the table saw.
From left to right the sizes of the trees are: 12"x36", 16"x25", and 10"x16" (the two trees on the right were cut from the same board)
While my husband was cutting, I got to work staining the "ornaments" and stars that were going to go on the trees. This pack of assorted wooden discs and the stars are from my local craft store. I gave each a single light coat of Golden Honey Color Stain.
To create the "pallet" look on the trees, I used a cotton swab to draw lines vertically down each tree using Chocolate Color Stain. I purposefully made the lines thick with stain to get a darker color.
Once the Chocolate stain was dry, I taped off strips of "garland" using Painter's tape. Then I applied a light coat of Forest Color Stain. Once that was dry, I applied a second light coat of the Forest to darken the color.
Once the Forest stain was dry, I removed the Painter's tape from the garland and reused it to tape off the outside edges of the garland and applied a single light coat of Brick Color Stain.
Once all of the stain was dry, I used a good epoxy to adhere the ornaments and stars to the trees.
It turned out to be such fun and rustic group of little trees! And I'm a big fan of traditional Christmas colors but you could easily mix it up with some of the other Color Stains (Coral and Turquoise would look amazing!). The pallet look pairs great with my new tobacco stick star, don't you think?
Happy Holidays!

